Rapid prototyping with Arduino and laser cutting in 4 hours
This is a new course and an in progress tutorial
For the Rapid Prototyping (short, 4 hours) course for Akademiet for Talentfulde Unge, you get
- An introduction to Arduino programming.
- A kit consisting of an Arduino microcontroller, some Neopixels, a servo, a microswitch and a potmeter
- An introduction to 2d vector drawing on computer
- An introduction to laser cutting
Then you can build some simple prototype using cardboard or HDF, the sensors in the kit, and programming.

Download arduino development environment. You don't have to pay.
Exercises/examples:
Detecting button pressed STATE
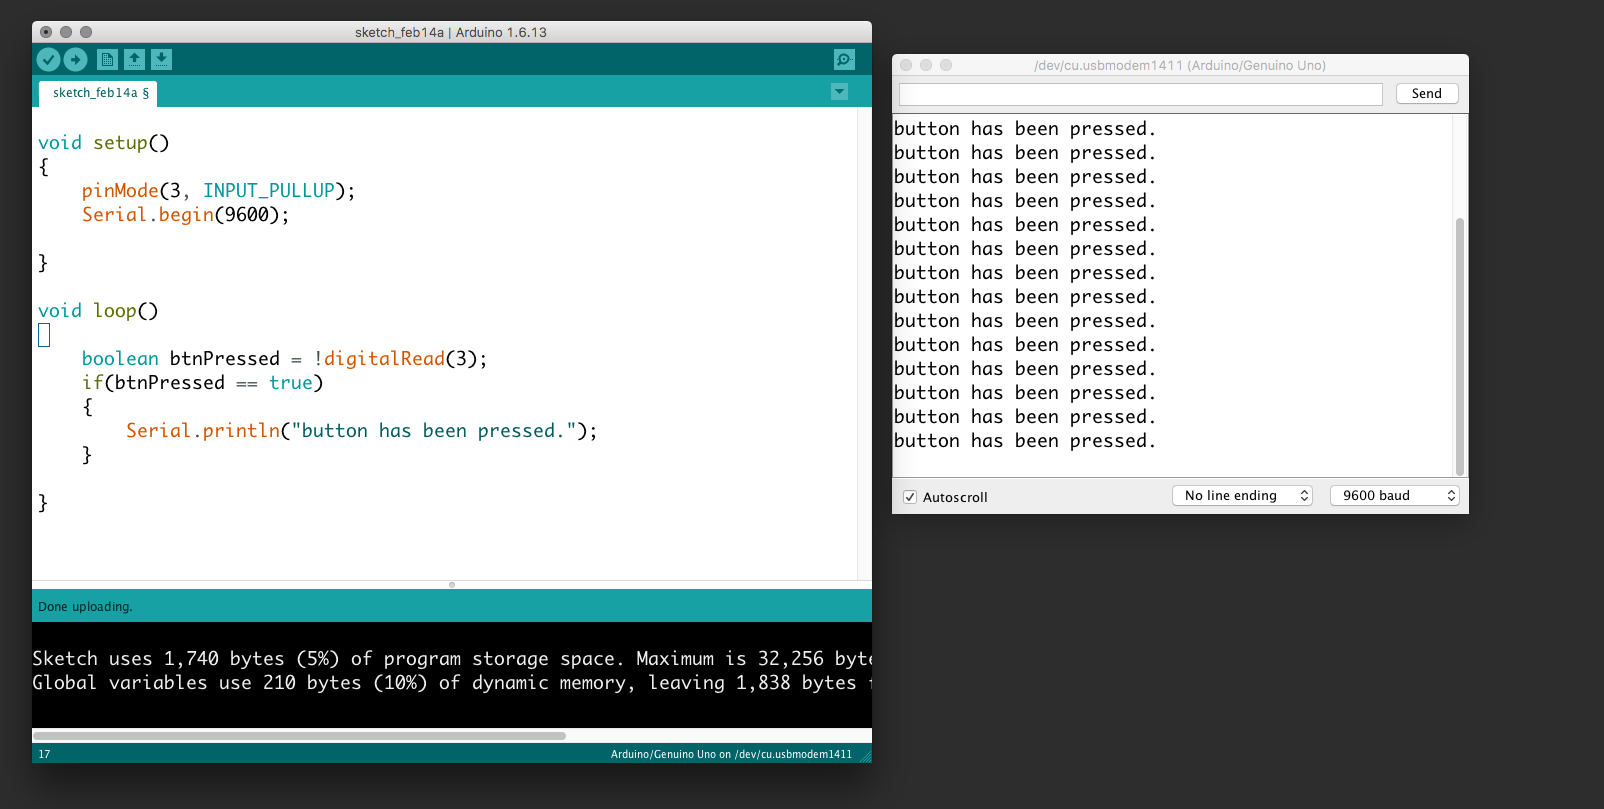
In the following example, we connect a button to the Arduino and send a message repeatedly somebody presses it. Be aware that we use the internal pull-up so the button has to be connected to ground (not to +5V). Further, we use the serial communication to receive the messages to our prompt. Use the "search icon" (upper right corner in the Arduino development environment) to view the serial prompt.

        void setup()
        {
            pinMode(3, INPUT_PULLUP);
            Serial.begin(9600);

        }

        void loop()
        {
            boolean btnPressed = !digitalRead(3);
            if(btnPressed == true)
            {
                Serial.println("button has been pressed.");
            }

        }
Detecting button single press - An EVENT
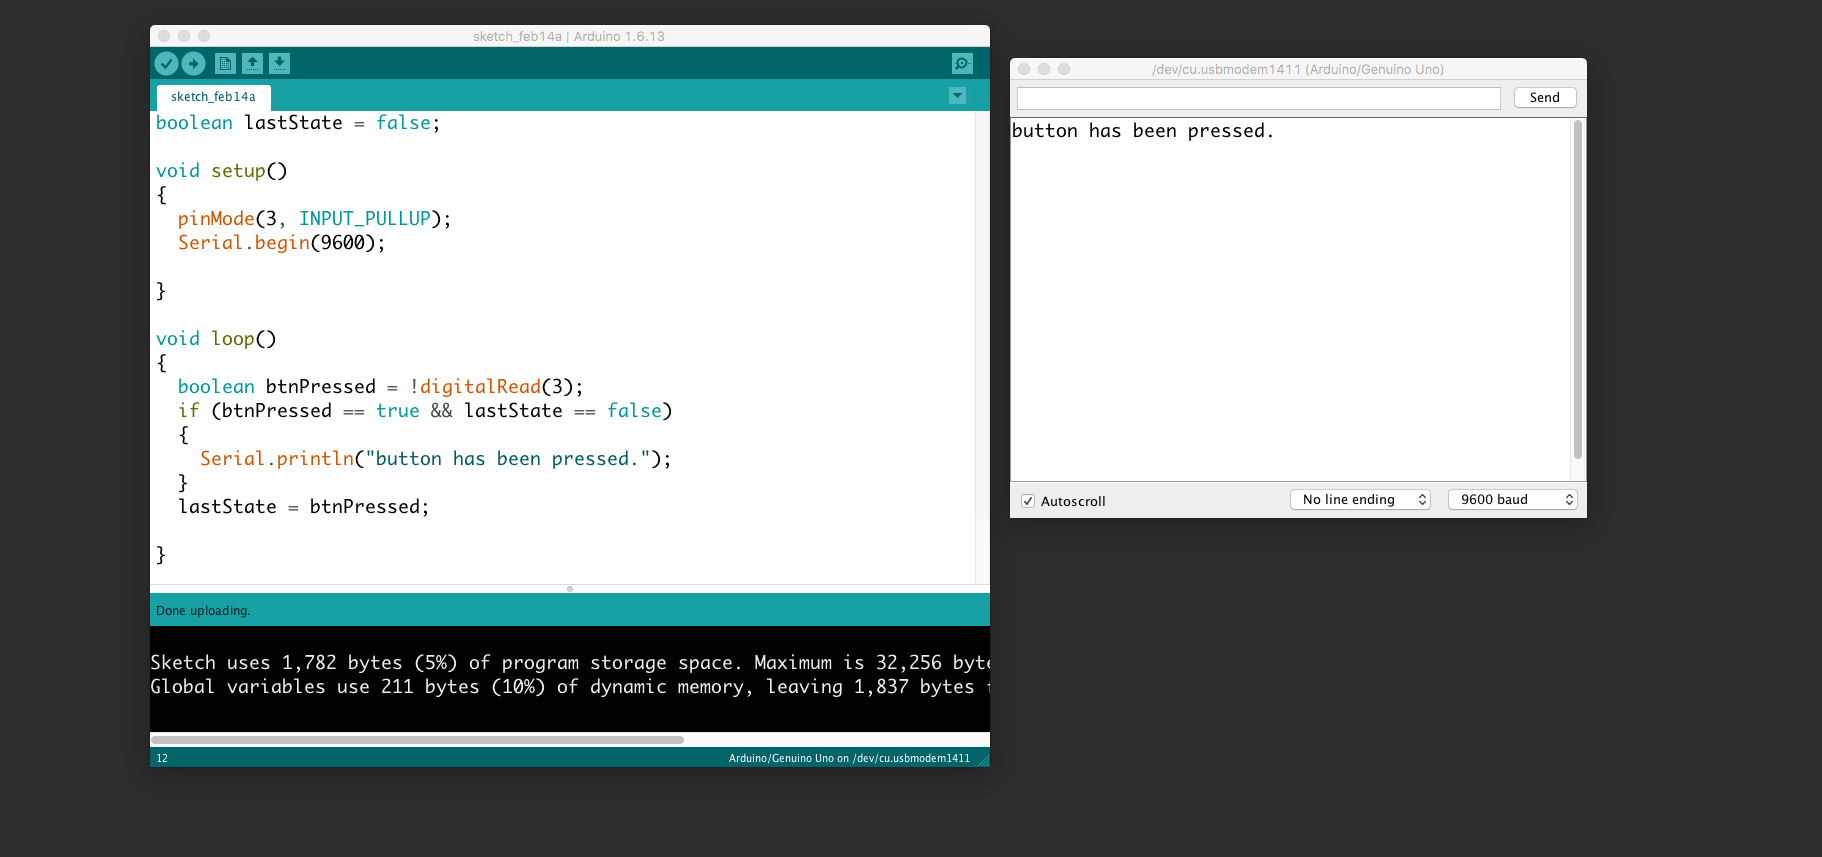
The event of pressing the button. Use the same wiring as above.
  boolean lastState = false;

  void setup()
  {
    pinMode(3, INPUT_PULLUP);
    Serial.begin(9600);

  }

  void loop()
  {
    boolean btnPressed = !digitalRead(3);
    if (btnPressed == true && lastState == false)
    {
      Serial.println("button has been pressed.");
    }
    lastState = btnPressed;

  }
Control neopixels
Neopixels are versatile light strings where each diode can be controlled individually. Each one has Red, Green, and Blue and can be from 0 to 255 in brightness. Multiple libraries exists to use noepixels. We suggest you use fastled.
Add the library: "menu->sketch->include library->manage libraries"

Search for "fastled" and click install

Use this wiring:

IMPORTANT: connect 5v to v, Di to s and G to g AND make sure the direction is correct:

This example sketch will turn red, green and blue for the first three pixels:
  #include "FastLED.h"

  // How many leds in your strip?
  #define NUM_LEDS 10
  #define DATA_PIN 4


  // Define the array of leds
  CRGB leds[NUM_LEDS];

  void setup() {
          FastLED.addLeds<NEOPIXEL, DATA_PIN>(leds, NUM_LEDS);
  }

  void loop() {
    // Turn the LED on, then pause
    leds[0]= CRGB( 255, 0, 0);
    leds[1]= CRGB( 0, 255, 0);
    leds[2]= CRGB( 0, 0, 255);
    FastLED.show();

  }
This example will turn all the 12 leds red:
#include "FastLED.h"

// How many leds in your strip?
#define NUM_LEDS 13
#define DATA_PIN 4


// Define the array of leds
CRGB leds[NUM_LEDS];

void setup() {
  FastLED.addLeds<NEOPIXEL, DATA_PIN>(leds, NUM_LEDS);
}

void loop() {

  for (int i = 0; i < NUM_LEDS; i = i + 1)
  {
    leds[i] = CRGB( 255, 0, 0);
  }
  FastLED.show();

}
This example makes a chase
#include "FastLED.h"

// How many leds in your strip?
#define NUM_LEDS 13
#define DATA_PIN 4


// Define the array of leds
CRGB leds[NUM_LEDS];

void setup() {
  FastLED.addLeds<NEOPIXEL, DATA_PIN>(leds, NUM_LEDS);
  Serial.begin(9600);
}
int numLedsOn = 0;
void loop() {

  for (int i = 0; i < NUM_LEDS; i = i + 1)
  {
    if (i < numLedsOn)
    {
      leds[i] = CRGB( 255, 0, 0);
    }
    else
    {
      leds[i] = CRGB( 0, 0, 0);
    }
  }

  FastLED.show();
  numLedsOn = numLedsOn + 1;
  if (numLedsOn == NUM_LEDS)
  {
    numLedsOn = 0;
  }
  Serial.println(numLedsOn);

  delay(100);

}
Button + neopixels
This example connects the button (input) to the neopixels (output). Thus, your first interactive installation.

  #include "FastLED.h"

  // How many leds in your strip?
  #define NUM_LEDS 10
  #define DATA_PIN 4


  // Define the array of leds
  CRGB leds[NUM_LEDS];

  void setup() {
    FastLED.addLeds<NEOPIXEL, DATA_PIN>(leds, NUM_LEDS);
    pinMode(3, INPUT_PULLUP);
  }

  void loop() {

    boolean btnPressed = !digitalRead(3);
    if (btnPressed == true)
    {
      leds[0] = CRGB( 255, 0, 0);
      leds[1] = CRGB( 0, 255, 0);
      leds[2] = CRGB( 0, 0, 255);
    }
    else
    {
      leds[0] = CRGB( 0, 0, 0);
      leds[1] = CRGB( 0, 0, 0);
      leds[2] = CRGB( 0, 0, 0);

    }
    FastLED.show();

  }
Control a servo
Servos are motors in which their position can be controlled. They have an action radius of 0 to 180 degrees. Some servos are "hacked" to be continuous. They will rotate 360 degrees, but cannot be positioned. They are then able to move in a controlled speed and direction. Orange wire is signal and should be connected to S.

  #include <Servo.h>

  Servo myservo;  // create servo object to control a servo
  // twelve servo objects can be created on most boards

  int pos = 0;    // variable to store the servo position

  void setup() {
    myservo.attach(5);  // attaches the servo on pin 5 to the servo object
  }

  void loop() {

    for (pos = 0; pos <= 180; pos += 1) { // goes from 0 degrees to 180 degrees
      // in steps of 1 degree
      myservo.write(pos);              // tell servo to go to position in variable 'pos'
      delay(15);                       // waits 15ms for the servo to reach the position
    }
    for (pos = 180; pos >= 0; pos -= 1) { // goes from 180 degrees to 0 degrees
      myservo.write(pos);              // tell servo to go to position in variable 'pos'
      delay(15);                       // waits 15ms for the servo to reach the position
    }
  }
Timing without delay
Using delay is bad practice because it halts everything on the board. Instead use "millis()". This example does something every two seconds:
unsigned long timer = 0;
void setup()
{

}

void loop()
{
    if(millis()-timer > 2000) // do something every two seconds)
    {
      timer = millis();
       //do something here
    }
}
For the advanced student, there are more general guides on programming here and here.
