IxD programming patterns
The secret trick to mastering programming is to recognize the patterns that makes up structures for common solutions to problems. In the following we have collected the most common patterns that everry interaction design programmer needs to know to create basic interactions with Arduino or Processing.
We have tried to make the examples as generic as possible. Where there are only an example for one platform it should be relatively simple to convert it to the other. Be aware that the main method in processing is called draw() and it is called loop() in Arduino. Simply change the words depending on the platform used.
Common mistakes and how to fix them
When starting out programming you will make a few common mistakes. This lists some of them and how to fix them:
- Forgetting a semicolon: If you forget to put a semicolon at the end of a line the program will not run. Add the semicolon where missing (usually the line above the one that throws and error).
- Adding a semicolon after an if statement: There should newer be a semicolon after an if statement. This one is hard to detect because the program will run, but it will always run the code inside the curly braces {}.
- Too many or too few curly braces. Be very carefull with your curly braces if you add too many or have to few the program will not run. Make sure to indent your code properly so you are able to read it. Everything inside a curly brace should be indented.
- Remember to relieve the stress on the cables: Most Arduino projects ends up having multiple wires hanging everywhere. If you do not tie them to the board but leave them hanging in the soldering points they will break. Use a ziptie so mount them to the edge of the board or to the inside of a box.
- Document your setup: If you do not document your setup you will be in a lot of pain when everything falls apart and you are trying to figure where the blue wire were supposed to be connected and where whether the red wire is 5v or ground. Use your camera phone to take pictures of your wiring on a regular basis.
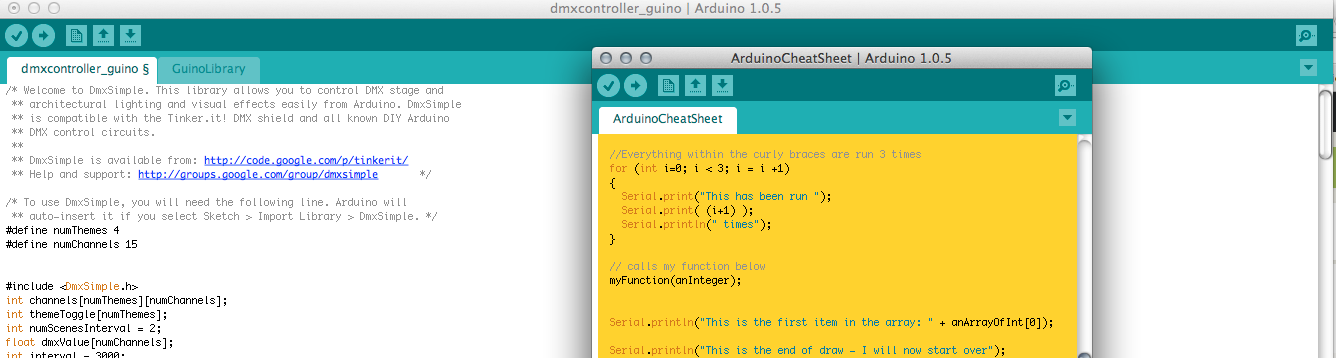
Sending DMX FROM an Arduino
When you want to send DMX from Arduino you have a couple of possible solutions:
- DMXSimple
- DMXSimple Width a gui
- How to do the wiring (you do not need the resister)
- How to CNC your own Shield
Sending Midi from an Arduino
This toturial does a good job introducing midi.
Doing something while a button is pressed
First step is to change something while a button is pressed. The code looks like this:
Arduino:
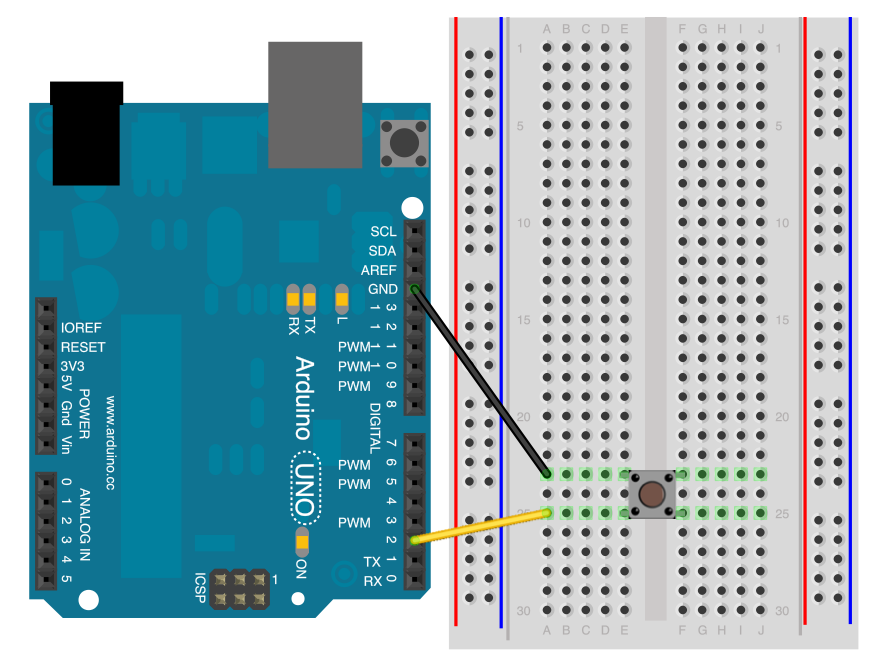 (Diagram for a push button)
void setup()
{
    pinMode(2, INPUT_PULLUP);

}

void loop()
{
    boolean btnPressed = !digitalRead(2);
    if(btnPressed == true)
    {
        // button has been pressed.

    }
    else
    {
        // button isn ot pressed
    }

}
Processing:
void setup()
{


}

void draw()
{
    boolean btnPressed = mousePressed;
    if(btnPressed == true)
    {
        // button has been pressed.

    }
    else
    {
        // button isn ot pressed
    }

}
Detecting a push button event
The above extample only works when you want to react to a state. This is not the same as an event. An event is when something changes from one state to another. E.g. you want to do something when the button was pressed => Going from a open state to a closed state. This requires os to "remember" the old state an compare it to detect the change:
Arduino:
boolean btnPressedOld = false;
void setup()
{
    pinMode(3, INPUT_PULLUP);

}

void loop()
{
    boolean btnPressed = !digitalRead(3);
    if(btnPressed == true && btnPressedOld == false)
    {
        // button has been pressed.

    }
    btnPressedOld = btnPressed;


}
Processing:
boolean btnPressedOld = false;
void setup()
{


}

void draw()
{
    boolean btnPressed = mousePressed;

    if(btnPressed == true && btnPressedOld == false)
    {
        // button has been pressed.

    }
    btnPressedOld = btnPressed;


}
Make a toggle button
Toggling with a pushbutton is a common solution to turning things on an off. This is one way to do it:
Arduino:
boolean btnPressedOld = false;
boolean toggle = false;

void setup()
{
    pinMode(3, INPUT_PULLUP);

}

void loop()
{
    boolean btnPressed = !digitalRead(3);
    if(btnPressed == true && btnPressedOld == false)
    {
        // button has been pressed.
        toggle = !toggle;

    }
    btnPressedOld = btnPressed;

    if(toggle == true)
    {
        // the butten has been toggled on.
    }


}
Processing:
boolean btnPressedOld = false;
boolean toggle = false;

void setup()
{


}

void draw()
{
  boolean btnPressed = mousePressed;
if(btnPressed == true && btnPressedOld == false)
    {
      // button has been pressed.
        toggle = !toggle;

    }
     btnPressedOld = btnPressed;

    if(toggle == true)
    {
      background(0,255,0);
      // the butten has been toggled on.
    }
    else
    {
       background(0);
    }

}
Make an interval timer
Arduino:
unsigned long timer = 0;
void setup()
{

}

void loop()
{
    if(millis()-timer > 2000) // do something every two seconds)
    {
      timer = millis();
       //do something here
    }
}
Processing:
long timer = 0;
void setup()
{

}

void draw()
{
    if(millis()-timer > 2000) // do something every two seconds)
    {
      timer = millis();
      //do something here
    }
}
Debugging
As the complexity of the code grows you will need to debug your variables. To do this you can send characters to your terminal.
Arduino:
float value = 20;

void setup()
{
    Serial.begin(9600);
}


void loop()
{
    Serial.println("The value is: ");
    Serial.println(value);

}
Processing:
float value = 20;

void setup()
{

}

void draw()
{
    println("The value is: " + value);

}
Timing an event
At some point you need to time an event. A button has been pressed and you want to do something e.g. two seconds later. To do so you need to register the time the button was pressed and look for when e.g. two seconds has passed from then:
Processing:
long timeWhenPressed = 0;
boolean oldMouseState = 0;
boolean timerActive = false;
void setup()
{


}

void draw()
{

    if(mousePressed==true)
    {
        timeWhenPressed = millis();
        timerActive = true;

    }

    if(millis()-timeWhenPressed > 2000 && timerActive == true)
    {
        // do something two seconds later
        timerActive = false;

    }

}
Overflow safe use of millis()
When you have figured out the millis() trick to timing you will at some point find out that your program crashes after a while because your timer overflows. Since the timer increases at a fast pace at some point it will run out of space in the memory. When this happens it will overflow. This means that it will return to zero and start to count again. This can be embraced by letting your timer and millis overflow crazefully together.
This is the syntax:
Arduino:
unsigned long timer = 0;
void setup()
{

}

void loop()
{
    if(millis()-timer > 2000) // do something every two seconds)
    {
      timer = millis();
       //do something here
    }
}
Processing:
long timer = 0;
void setup()
{

}

void draw()
{
    if(millis()-timer > 2000) // do something every two seconds)
    {
      timer = millis();
      //do something here
    }
}
Read more about it here.
Detecting activity
When you have a fluctuating signal it can in your interest to measure the amount of activity / change.
Arduino:
float activity = 0;
float signalOld= 0;
float signal = 0;
void setup()
{


}

void loop()
{
    signal = analogRead(0);
    activity = activity * 0.1f + 0.9f * abs(signal-signalOld);
    signalOld = signal;

}
Changing the range of a signal
Let us say that we have a distance sensor returning a value between 0 and 1024 and we want to move a servo that has the range of 0 to 180. Put simply we can just divide by the difference in the range, but both Arduino and Processing have code to solve this problem:
float inputValue = analogRead(0); // mouseX if processing.
float output = map(inputValue,0,1024,0,180);
float output_constrained = constrain(output,0,180);
The last line makes sure that the output is newer outside of the range. It is good practice to use this.
Smoothen a noisy signal
If your signal is noisy or you want to have a more soft reaction pattern, then you can use a running avarage.
Arduino:
float smoothValue = 0;
void setup()
{


}

void draw()
{
    float inputValue = analogRead(0); //mouseX if processing
    smoothValue = smoothValue * 0.9f + 0.1f * inputValue;
}
The two numbers should always add up to 1. If you want it to be more smooth then make 0.1 smaller e.g.: "..* 0.99f + 0.01f *..".
Getting the distance between objects
This case is most common within processing. E.g. you have a mouse pointer and you want to know if the mouse touches an object.
Processing:
float ellipseX = 100;
float ellipseY = 100;

void setup()
{
    size(800,600);
}

void draw()
{
    ellipse(ellipseX,ellipseY,20,20);

    float distance = dist(ellipseX,ellipseY,mouseX,mouseY);

       if(distance < 20)
    {
        // The mouse is above the ellipse;

    }

}
Detect a mouse click within a square
In processing you sometimes need to design your own button interaction. To do this we need to define the active area of the mouse pointer. This is a simple pattern to solve this problem:
boolean btnPressedOld = false;
void setup()
{
    size(800,600);
}

void draw()
{

    if(mouseX > 100 && mouseX < 200 && mouseY > 100 && mouseY < 200 && mousePressed)
    {
        if(btnPressedOld == false)
        {
            /// Code in here will only run once, when the mouse has clicked within a 100x100 square positioned at 100,100.
        }
        btnPressedOld = true;
    }
    else
    {
        btnPressedOld = false;
    }


}
Fade in and fade out
To make something fade in and fade out you need to created a counter and add/subtract from it over time.
Arduino:
float value = 0;
float speed = 0.04;
float direction = 1;

void setup()
{

}

void loop()
{
    speed = analogRead(0)/1000;
    value = value + direction * speed;
    if(value > 255 || value < 0)
    {
        value = constrain(value,0,255);
        direction = direction * -1;
    }
    analogWrite(11,value);
}
Processing:
float value = 0;
float speed = 0.04; // defines the speeed of the fade
void setup()
{

}

void loop()
{
    value = value + direction;
    if(value > 255 || value < 0)
    {
        value = constrain(value,0,255);
        speed = speed * -1; // changes the direction
    }
    analogWrite(11,value);
}
Creating a state machine
As the complexity of your code grows you will need to have multiple states where different lines of code should happpen:
Processing:
int currentState = 0;

void setup()
{


}

void draw()
{


    if(currentState == 0)
    {
        background(0);
        if(MousePressed)
        {
            currentState == 1;
        }
    }
    else if(currentState==1)
    {
        background(0,255,0);
           if(MousePressed)
        {
            currentState == 2;
        }

    }
    else if(currentState==2)
    {

        background(0,255,255);
        if(MousePressed)
        {
            currentState == 0;
        }
    }

}
Detecting a long press
Check if a button has been pressed for a particular minimum time (in this example 3 seconds). This can provide safety (e.g. for a reset button, check that someone actually means it, not just touched the button by accident) and provides implicit debouncing of a glitchy signal.
// At the top of the program:
long buttonPushedTime = 0;
const int buttonPin = 6; // whichever pin you actually have the button connected to. The button should connect the pin to ground when pushed.


void setup()
{
// In setup:
pinMode(buttonPin, INPUT_PULLUP);
}

void loop()
{
// In loop:
if(!digitalRead(buttonPin) && lastButtonState){
        buttonPushedTime = millis();
}


if(!digitalRead(buttonPin) && millis() - buttonPushedTime > 3000){
        //DO SOMETHING!!!
}


lastButtonState = digitalRead(buttonPin);
}
Basic syntax
The grammer of programming is pretty simple when you get to understand it. These two programs use the basic grammer and enables you to quickly look up the different ways of programming.
Arduino:
// ********************************************************
// ***    Basic syntac for Arduino - cheat sheet     ***
// ***    By: FabLab RUC - Mads Hobye - V1              ***
// ********************************************************

// Global variables defined by the user

float aDecimal = 0.5f; // float creates a decimal (kommatal)
int anInteger = 100; // int creates an integer (heltal)
boolean aLogical = true; // boolean creates an a logical operater (only true or false)
int anArrayOfInt[] = {
  1, 2, 3, 4, 5
};


// setup() runs once when you start the program.
// the curly braces defines the boundary of the setup() funciton
void setup()
{
  Serial.begin(9600); //Start the serial port
  Serial.println("This message is only presented once"); // "println" prints a line in the debug prompt
}

// loop() repeats endlessly.
void loop()
{

  int myLocalInt = 3; // This is a local variable only accessible within draw

  Serial.println("This is the beginning of draw");

  // An if statement - only runs if the variable "anInteger" is equal to 100
  if (anInteger == 100)
  {
    Serial.println("The anInteger is 100");
  }
  else // only runs if "anInteger" is not equal to 100 then
  {
    Serial.println("Change anInteger to something else than 100 to run me");
  }

  //Everything within the curly braces are run 3 times
  for (int i=0; i < 3; i = i +1)
  {
    Serial.print("This has been run ");
    Serial.print( (i+1) );
    Serial.println(" times");
  }

  // calls my function below
  myFunction(anInteger);


  Serial.println("This is the first item in the array: " + anArrayOfInt[0]);

  Serial.println("This is the end of draw - I will now start over");
} // when draw reaches the end it start over.


//This is a custom function called myFunction()
void myFunction(int _input)
{
  Serial.println("This is my custom function");
  Serial.println("You gave me the number:" + _input);
}
Processing:
  // ********************************************************
  // ***    Basic syntac for Processing - cheat sheet     ***
  // ***    By: FabLab RUC - Mads Hobye - V1              ***
  // ********************************************************

  // Global variables defined by the user

  float aDecimal = 0.5f; // float creates a decimal (kommatal)
  int anInteger = 100; // int creates an integer (heltal)
  boolean aLogical = true; // boolean creates an a logical operater (only true or false)
  ArrayList<Integer> anArrayOfInt = new ArrayList<Integer>();

  myClass myObject;


  // setup() runs once when you start the program.
  // the curly braces defines the boundary of the setup() funciton
  void setup()
  {
    println("This message is only presented once"); // "println" prints a line in the debug prompt
    anArrayOfInt.add(1);
    anArrayOfInt.add(3);
    anArrayOfInt.add(4);
    anArrayOfInt.add(5);
    anArrayOfInt.add(6);

  }

  // draw() repeats endlessly.
  void draw()
  {
    myObject = new myClass(); // Creates and object from the class below
    int myLocalInt = 3; // This is a local variable only accessible within draw

    println("This is the beginning of draw");

    // An if statement - only runs if the variable "anInteger" is equal to 100
    if (anInteger == 100)
    {
      println("The anInteger is 100");
    }
    else // only runs if "anInteger" is not equal to 100 then
    {
      println("Change anInteger to something else than 100 to run me");
    }

    //Everything within the curly braces are run 3 times
    for (int i=0; i < 3; i = i +1)
    {
      println("This has been run " + (i+1) + " times");
    }

    // calls my function below
    myFunction(anInteger);

    // calls classFunction in myObject
    myObject.classFunction();

    println("This is the first item in the array: " + anArrayOfInt.get(0));

    println("This is the end of draw - I will now start over");
  } // when draw reaches the end it start over.


  //This is a custom function called myFunction()
  void myFunction(int _input)
  {
    println("This is my custom function");
    println("You gave me the number:" + _input);
  }


  class myClass
  {
    int classVariable = 0; // local variable for myClass
    void classFunction()
    {
      println("You called the subfunction for my class");
    }
  }
