DMX graphical user interface for Arduino

Controlling DMX is a rather easy task with SimpleDMX. With this example we have extended the library to have a Controller interface via GUINO.
This way one can use your pc as a simple DMX controller interface for light control. The sample code has four scenes and can control the first 15 lamps. The interesting part is that the interface can be extendend or integrated with interactive code within Arduino - this way one get the best of two worlds.
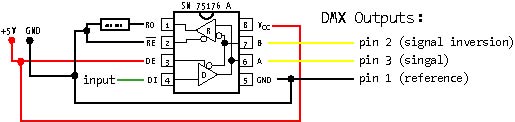
Build your own shield
 (You should not connect the resistor - pin 1 on the chip should be left untouched)
You can find instructions on how to build your own shield here.
Upload the code
Installing the software requires you to install a few libraries and upload the sketch to the Arduino. Follow the following steps to do it:
- Download the code here.
- Copy the folder inside "Copy to your Arduino lib folder" to "Documents/Arduino/libraries".
- Open the Arduino sketch inside "dmxcontroller_guino".
- Make sure to set the correct pin used for DMX: DmxSimple.usePin(6);.
- Press upload in the Arduino interface.
Run Guino

To Run Guino, open the app in the folder "GuinoApps". The app works with Windows and Mac.
- Choose the proper serial port (Windows can only handle com9 and below).
- Press connect.
- Hereby select which Scene to control and start dragging the sliders to change the values on each channel.
- Press the button "automatic" if you want to automatically transition between different scenes.
