Wemos intro & wifi upload to thingspeak
Wemos installation guide
A cuick guide on how to get starteds with the Wemos D1, wireless enabled microcontroller.
What to do
- Install arduino (IDE), not the online version
- Install the USB-Wemos serial driver directly from the manufacturer of the Serial chip. Look carefully, find the right drivere for MAC & Windows between the Chinese signs.
- In the Arduino software, add the wemos-board:
- Go to Menu: File / Preferences.
- Type the below link into the "Additional boards managers" URL field:
https://arduino.esp8266.com/stable/package_esp8266com_index.json
- Type the below link into the "Additional boards managers" URL field:
- Install the board by going to Menu: Tools / board / board manager. Type “ESP8266” In the search field. Press the install box
- Restart arduino & Restart your computer.
- Final setup in the Arduino software:
- Connect the wemos to your computer with a micro-usb cable.
- Go to tools / Board and select and select "Wemos D1 R2 & mini".
- Go to tools / Port and select the port where it says "...usb serial 14310.." or something similar. (ry out the different COM-ports shown until it works.
- Test the board with the blink code. Menu: File / Sketchbook / D1miniExamples / Blink. Or use the code below.
- Before uploading set upload speed to the highest number.
- Trouble shooting guide if things doesn't work:
- Restart Arduino and restart your computer.
- If the serial monitor shows strange signs. Set "9600 baud" to "115200 baud" in the drop down menu in the serial monitor window.
- Check that you have installed all the libraries to the sensors that you use.
// Wemos D1 Blink example.
void setup() {
  pinMode(BUILTIN_LED, OUTPUT);  // initialize onboard LED as output
  Serial.begin(115200); // Wemos uses another serial communication speed than arduino, thus initiate serial communication with 115200 or slower.
}

void loop() {
  digitalWrite(BUILTIN_LED, HIGH);  // turn on LED with voltage HIGH
  delay(1000);                      // wait one second
  digitalWrite(BUILTIN_LED, LOW);   // turn off LED with voltage LOW
  delay(1000);                      // wait one second
}
DHT11 / 22 + Wemos
Connecting the DHT11/22 Sensor to Wemos

Install the DHT sensor libraries:
- Menu: Sketch / include library / Manage Libraries. Search & install:
- "dht sensor library" by ‡†adafruit
- “Adafruit unified library”
Code
#include <DHT.h>

#define DHTPIN D2
#define DHTTYPE DHT11
DHT dht(DHTPIN, DHTTYPE);

void setup() {
  Serial.begin(115200);
  delay(10);
  dht.begin();
}

void loop() {
  float h = dht.readHumidity();
  float t = dht.readTemperature();
  if (isnan(h) || isnan(t))
  {
    Serial.println("Failed to read from DHT sensor!");
    return;
  }

  Serial.print("Temperature: ");
  Serial.print(t);
  Serial.print(" degrees Celsius Humidity: ");
  Serial.println(h);

}
Connecting to Thingspeak
To store your data online and make analysis we will use the service Thingspeak.
(Instruction taken from this guide)
You will now need to create a new account at thingspeak –
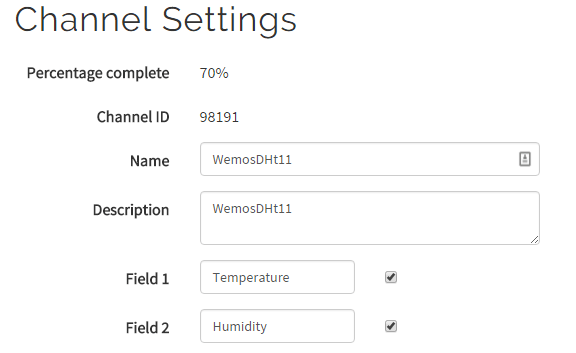
https://thingspeak.com . Once done create a new channel and add two new fields, one will hold the temperature reading and the other will hold the humidity reading from our DHT11. This should look something like this:

Make sure you write your API-Key
This code connects you to RUC IoT Wifi connection. If you want to connect to other wifi connection you need to change the fields "ssid" and "password".
Code
#include <DHT.h>
#include <ESP8266WiFi.h>

// replace with your channel’s thingspeak API key and your SSID and password
String apiKey = "xxx";
const char* ssid = "RUC-IOT";
const char* password = "gihalaha19";
const char* server = "api.thingspeak.com";

#define DHTPIN D2
#define DHTTYPE DHT11
//#define DHTTYPE DHT22

DHT dht(DHTPIN, DHTTYPE);
WiFiClient client;

void setup()
{
  Serial.begin(115200);
  delay(10);
  dht.begin();

  WiFi.begin(ssid, password);

  Serial.println();
  Serial.println();
  Serial.print("Connecting to ");
  Serial.println(ssid);

  WiFi.begin(ssid, password);

  while (WiFi.status() != WL_CONNECTED)
  {
    delay(500);
    Serial.print(".");
  }
  Serial.println("");
  Serial.println("WiFi connected");

}

void loop()
{

  float h = dht.readHumidity();
  float t = dht.readTemperature();
  if (isnan(h) || isnan(t))
  {
    Serial.println("Failed to read from DHT sensor!");
    return;
  }

  if (client.connect(server, 80)) {
    String postStr = apiKey;
    postStr += "&field1=";
    postStr += String(t);
    postStr += "&field2=";
    postStr += String(h);
    postStr += "\r\n\r\n";

    client.print("POST /update HTTP/1.1\n");
    client.print("Host: api.thingspeak.com\n");
    client.print("Connection: close\n");
    client.print("X-THINGSPEAKAPIKEY: " + apiKey + "\n");
    client.print("Content-Type: application/x-www-form-urlencoded\n");
    client.print("Content-Length: ");
    client.print(postStr.length());
    client.print("\n\n");
    client.print(postStr);

    Serial.print("Temperature: ");
    Serial.print(t);
    Serial.print(" degrees Celsius Humidity: ");
    Serial.print(h);
    Serial.println("Sending data to Thingspeak");
  }
  client.stop();

  Serial.println("Waiting 20 secs");
  // thingspeak needs at least a 15 sec delay between updates
  // 20 seconds to be safe
  delay(20000);
}

