Simple soil moisture monitoring with Arduino and ADCTouch capacitative sensing
[In Danish below]
Want the simplest possible soil moisture monitoring, without having to order and wait for a special sensor, and without any electrical contacts in the soil that corrode? Look no further than this example, which uses capacitative sensing and an insulated bit of wire as the sensor. No uninsulated contact to soil. No corrosion. Low price. Simple code.
This example by Nicolas Padfield for Høje Tåstrup kommunes 7th graders.
Uses the ADCTouch library by martin2250. Install this in Arduino -> Sketch -> Include library -> Manage libraries -> search for "adct", select ADCTouch by martin2250, click install.
You can see more about how this clever library works here: https://github.com/martin2250/ADCTouch
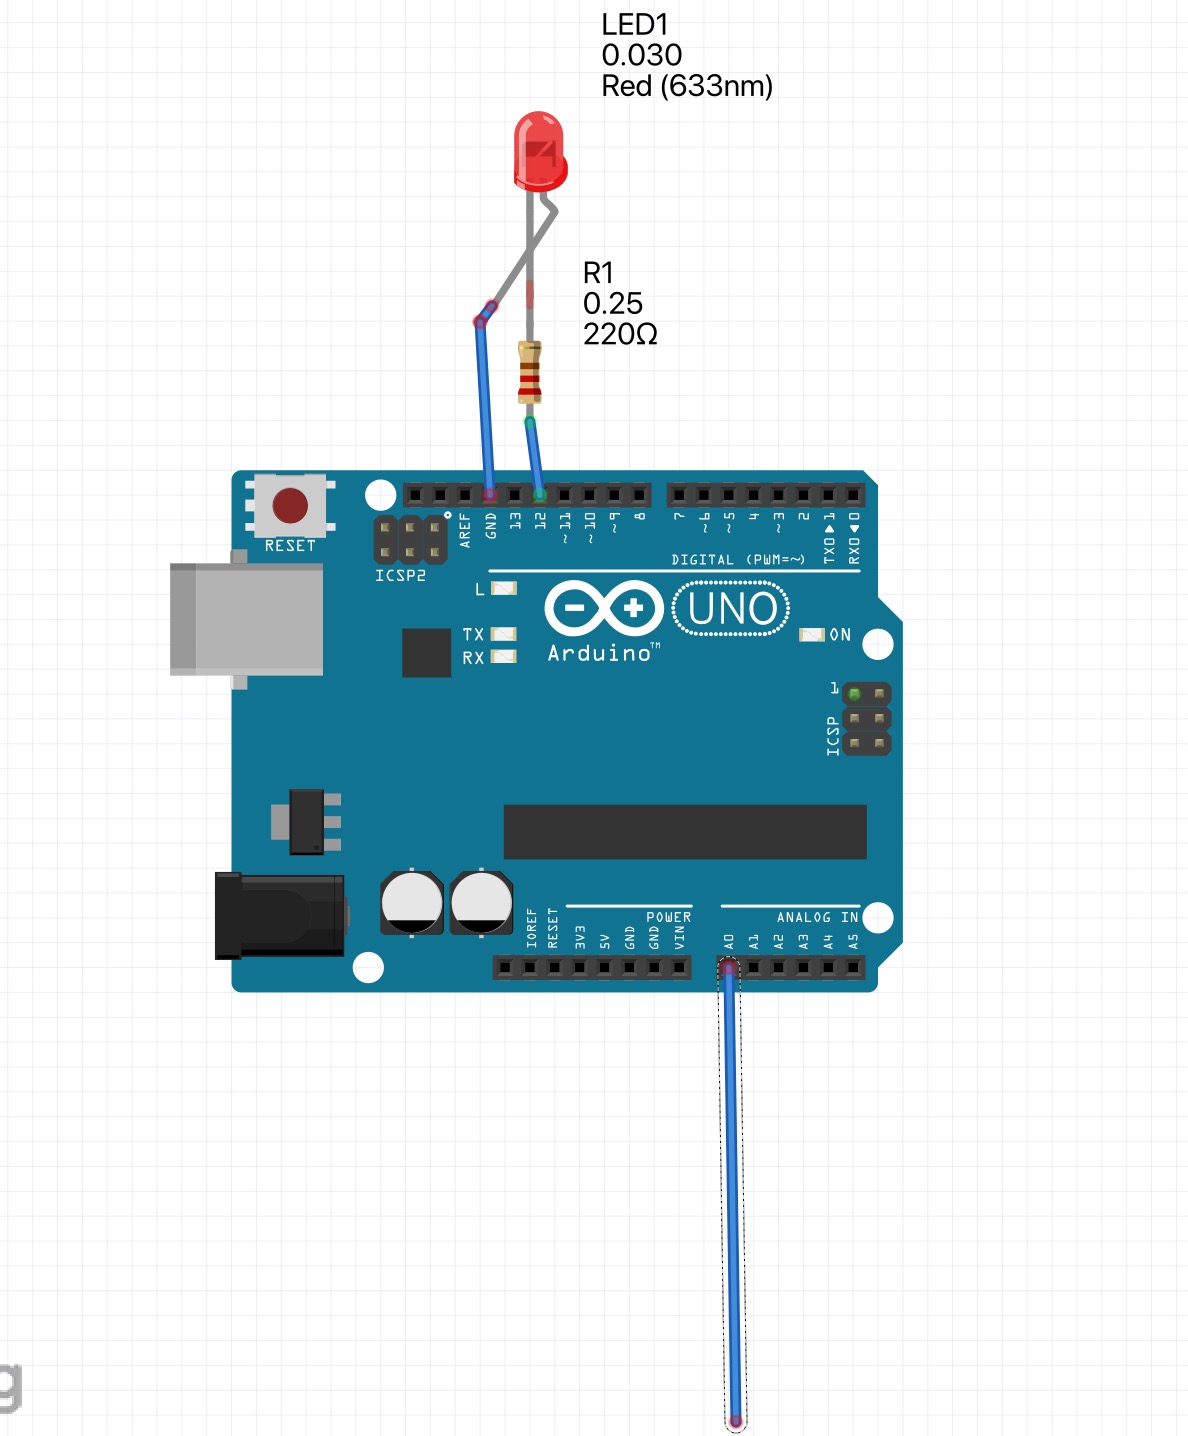
After you have installed the library, copy-paste the code below into Arduino. Upload. Open the serial monitor at 9600 baud. You can now experimentally figure out what value you want the warning LED to light up at. I use 600 - find your own preferred value by trying.
Possible learning points:
- What is a resistor? Why do we need a 220 ohm resistor before the LED?
- What is an ohm? Who was Georg Ohm?
- What alphabet does the ohm symbol Ω come from?
- What is an LED? How does it work?
- What is the voltage (5V) and current (20mA) across the LED?
- What other voltages do you know of? Which are safe? Which are dangerous to humans? Why? (nervous system)
- What is capacitance? How does capacitance let us measure water content without the wire actually touching anything?
- What are electrons?
- Why can is measure your hand?
- Do experiments with progressively wetter and wetter soil to find the value you would like the LED to turn off at.
På Dansk
Simpel jordfugtughedsmåling med kapacitans
Vil du have den enklest mulige jordfugtighedsovervågning, uden at skulle bestille og vente på en speciel sensor, og uden elektriske kontakter i jorden, der korroderer? Så er dette eksemplel lige noget for dig. Den bruger kapacitiv sensing og blot en isoleret stykke ledning som sensor. Ingen uisoleret kontakt med jord. Ingen korrosion. Lav pris. Simpel kode.
Dette eksempel af Nicolas Padfield for Høje Tåstrup kommunes 7. klasser.
Bruger ADCTouch-biblioteket af martin2250. Installer dette i Arduino -> Sketch -> Include library -> Manage libraries -> søg efter "adct", vælg ADCTouch by martin2250, klik på installer.
Du kan se mere om hvordan dette smarte bibliotek fungerer her: https://github.com/martin2250/ADCTouch
Når du har installeret biblioteket, skal du kopiere og indsætte koden nedenfor i Arduino. Upload. Åbn den serielle monitor ved 9600 baud. Du kan nu eksperimentelt finde ud af, hvilken værdi du ønsker, at advarsels-LED'en skal lyse ved. Jeg bruger 600 - find din egen foretrukne værdi ved at eksperimentere dig frem med jord ved forskelligt vandindhold.
Mulige læringsspørgsmål:
- Hvad er modstand? Hvorfor har vi brug for en 220 ohm modstand før LED'en?
- Hvad er en ohm? Hvem var Georg Ohm?
- Hvilken alfabet kommer symbolet for ohm Ω fra?
- Hvad er en LED? Hvordan virker den?
- Hvad er spændingen (5V) og strømmen (20mA) over LED'en?
- Hvilke andre spændinger kender du til? Hvilke er sikre? Hvilke er farlige for mennesker? Hvorfor? (nervesystem)
- Hvad er kapacitans? Hvordan lader kapacitansen os måle vandindholdet, uden at ledningen faktisk rører noget?
- Hvad er elektroner?
- Hvorfor kan den måle din hånd?
- Foretag eksperimenter med gradvist vådere og vådere jord for at finde den værdi, du gerne vil have, at LED'en skal slukke ved.
// install the library ADCTouch by martin2250 (Sketch -> Include library -> Manage libraries -> search for adct

#include <ADCTouch.h> // include the library which misuses the Analog to Digital Converter pins to measure capacitative touch/
// more explanation here https://github.com/martin2250/ADCTouch

// connect a 220 ohm resistor to pin 12, to + on an LED, and the - of the LED to GND

// connect a wire to A0. Wire should be with insulation - make sure a good amount of wire is in the soil, and make sure the other end of the wire is not in contact with the soil, but up out of the soil

// if you want to try using a BBC Microbit instead, see https://support.microbit.org/support/solutions/articles/19000116318-touch-sensing-on-the-micro-bit


int calibrate = 0;
int dry = 600;


void setup()
{

    pinMode(12, OUTPUT); // set pin number 12 to output so we can connect a LED to it (remember 200 ohm resistor)

    // normaly one would set pins to input or output here, but it is not neccesary / useful for the analog pins being used by the library

    Serial.begin(9600); // start the serial port to send messages to the computer, at 9600 baud = bits per second

    calibrate = ADCTouch.read(A0, 500);    //create reference value to account for the capacitance of the pad. We cannot do it this way, as the sensor is already down in the soil. Se we will have to manually get a refrence value once and for all and write it into the code
}

void loop()
{
    int value0 = ADCTouch.read(A0);   //no second parameter = 100 samples. If one adds a second parameter like this: ADCTouch.read(A0, 500); it takes 500 samples

    Serial.print(calibrate); // print the initial value value
    Serial.print("\t"); // print a TAB
    Serial.print(dry); // print the value under which we consider the soil "dry"
    Serial.print("\t"); // print a TAB
    Serial.print(value0); // print the raw data value
    Serial.print("\t"); // print a TAB

    if (value0 < dry){
        Serial.print("Too dry!");
        digitalWrite(12, HIGH); // turn LED on pin 12 on
    }
    else {
        Serial.print("Ok");
        digitalWrite(12, LOW); // turn LED on pin 12 off

    }

    Serial.print("\n"); // print a NEWLINE

    delay(1000); // wait 1 second = 1000 milliseconds
}