Fiber Laser Engraver
Fiber laser introduction
This Nd:YAG fiber galvo laser can put your design (max size 300x300 mm) on a wide variety of materials by very precise burning with a powerful laser beam. To some extent it can even mark metal in different colours. The optimal laser setting depends on the material, so unless you use a material that FabLab has a lot of experience with, you should have some extra/scrap material for testing. (See "material types" below).
The laser is controlled by LightBurn which looks a lot like many ordinary graphics design programs. You can import graphics from almost anywhere or design them in LightBurn. This guide will not go beyond the very simplest basics, use the tutorials, the "Help" menu or just search the internet for more info. You can also download a 30 day trial version for your own computer. We use the same software to control our laser cutters next door.
Safety
Firefighting instructions: Watch video in laser cutter room next door
- Galvanized metal or brass emit toxic zinc fumes when engraved, not recommended (brass engraves poorly anyway). At least make sure the suction is working well, and wait a good while for the fumes to clear before opening
- Objects may get very hot from being lased, be careful when taking them out.
- Laser stops automatically when opened. Emergency stop is by the start buttons (blue box below table).
- Watch closely over flammable materials.
- Wait for the suction to clear out fumes after engraving if necessary
- When working with thin materials that might burn/cut through such as thin plastic, put a metal plate underneath so you don't burn the workspace, perhaps use a print plate.
Quick and simple test project
 Let's mark a very simple design on a piece of plastic to get to know the basic functions. Open the laser hatch and grab one of the small white hexagonal cups on the right.
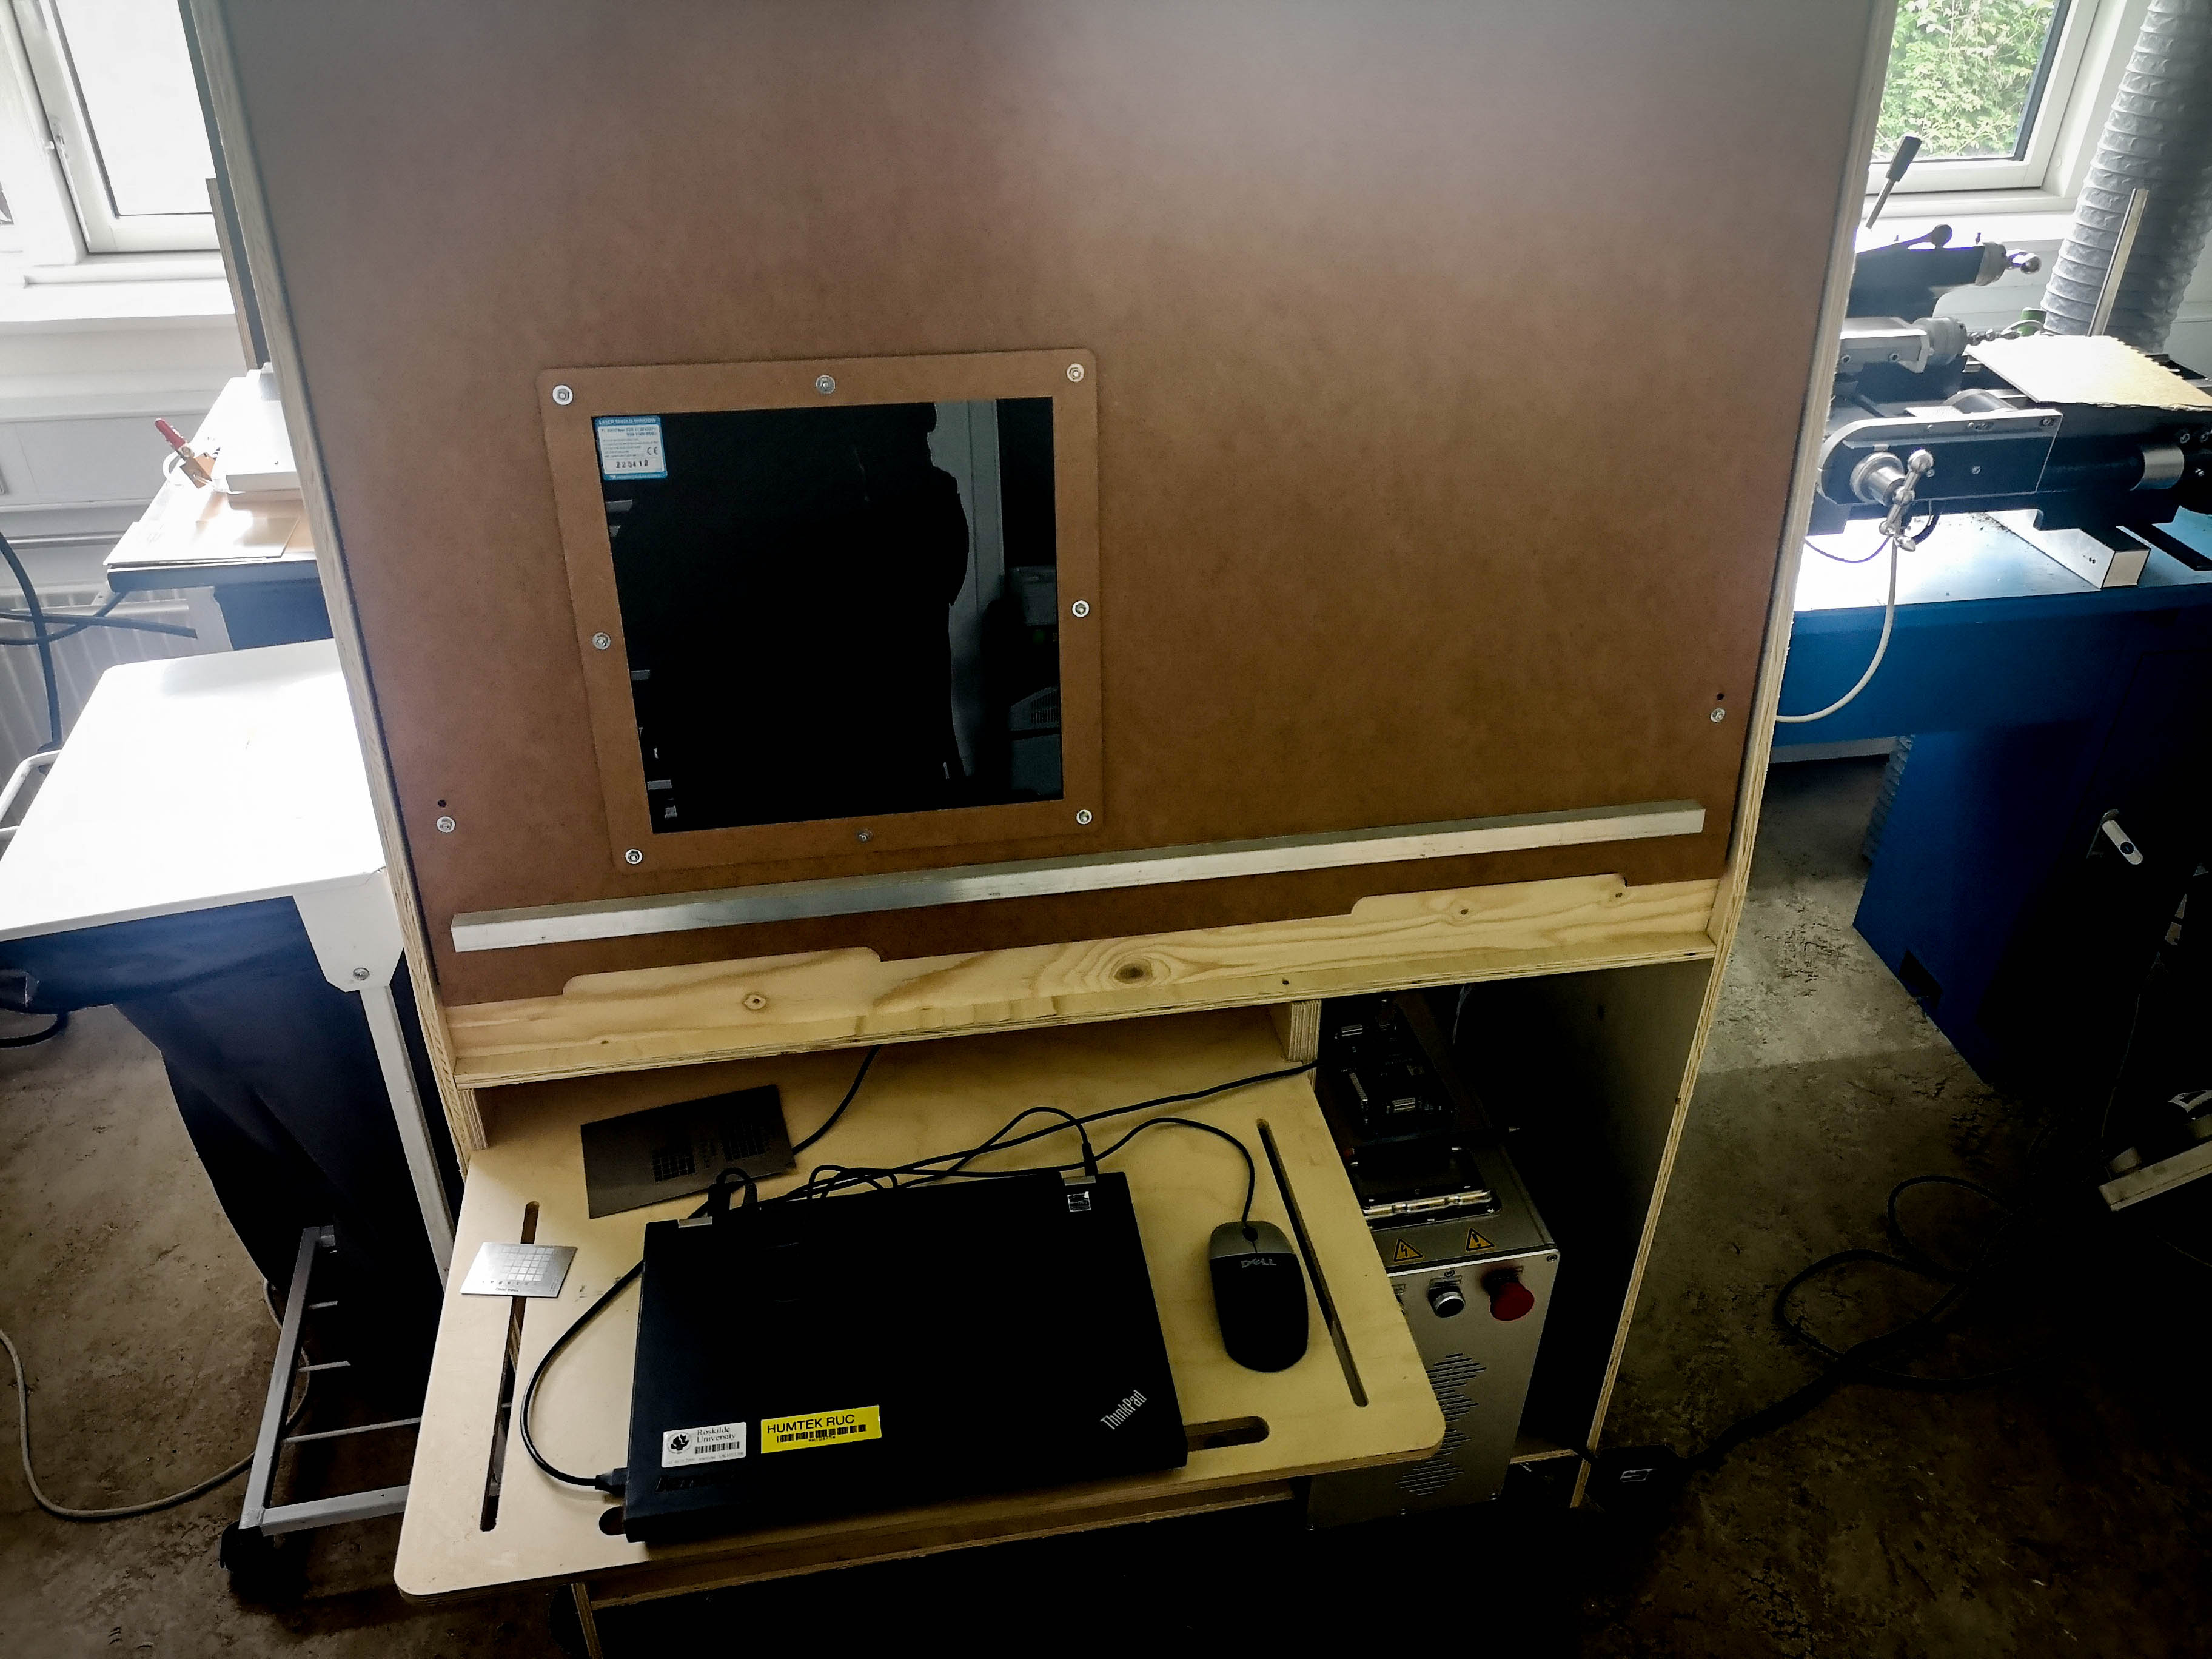
Turn on the ventilation (bottom right). Turn on the laptop. Start the laser and the laser controller using the two buttons on the left side of the blue box below the laptop table. (The laser cooling is loud, if you ever need to spend long time getting a design right switch off both buttons till you need them.)
Open the laser hatch and place your cup in the workspace under the red dot. Close the hatch, and reach up to turn the crank on top of the box to focus the laser: If you are too far up or down, the red dot splits in two. Leave the hatch open.
Click the LightBurn icon on the laptop. You should see Laser Ready on the right hand side by the start/stop buttons, like this:
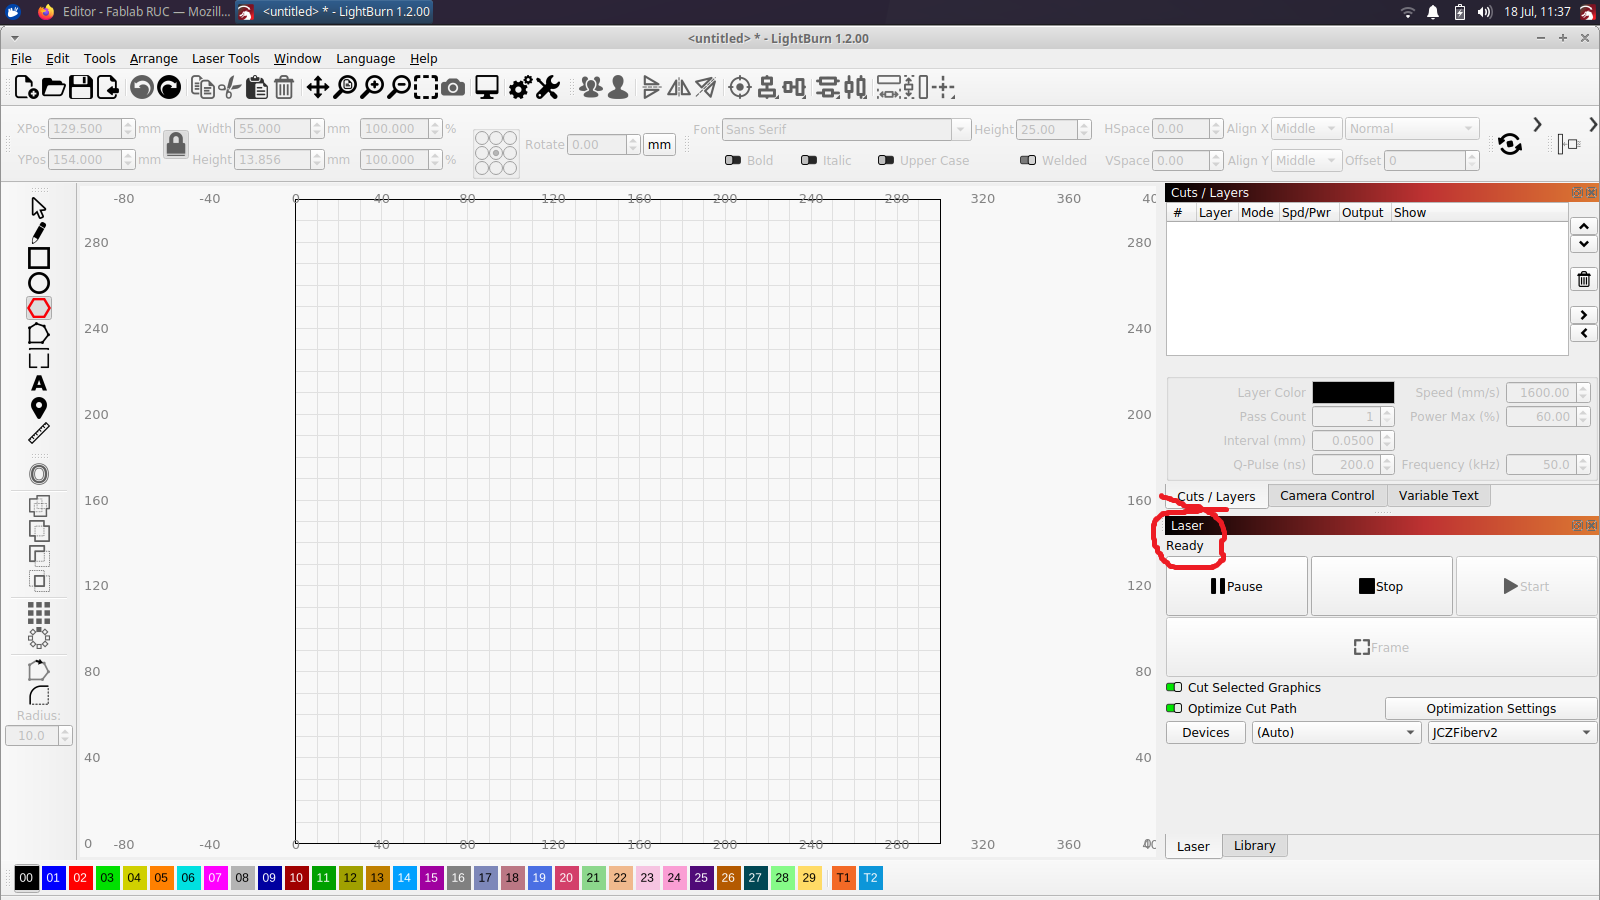 You will see that the laser allows you a workspace of 300x300 mm (notice the coordinates at the edges of the workspace). The red dot is right in the center at (x,y) = (150,150).
Click the hexagon on the left and click and drag the mouse to make a small "flat" hexagon near the center, 20 mm wide or so (zoom in and out with the mouse wheel). Make another small "tall" hexagon above it. It should look something like this.
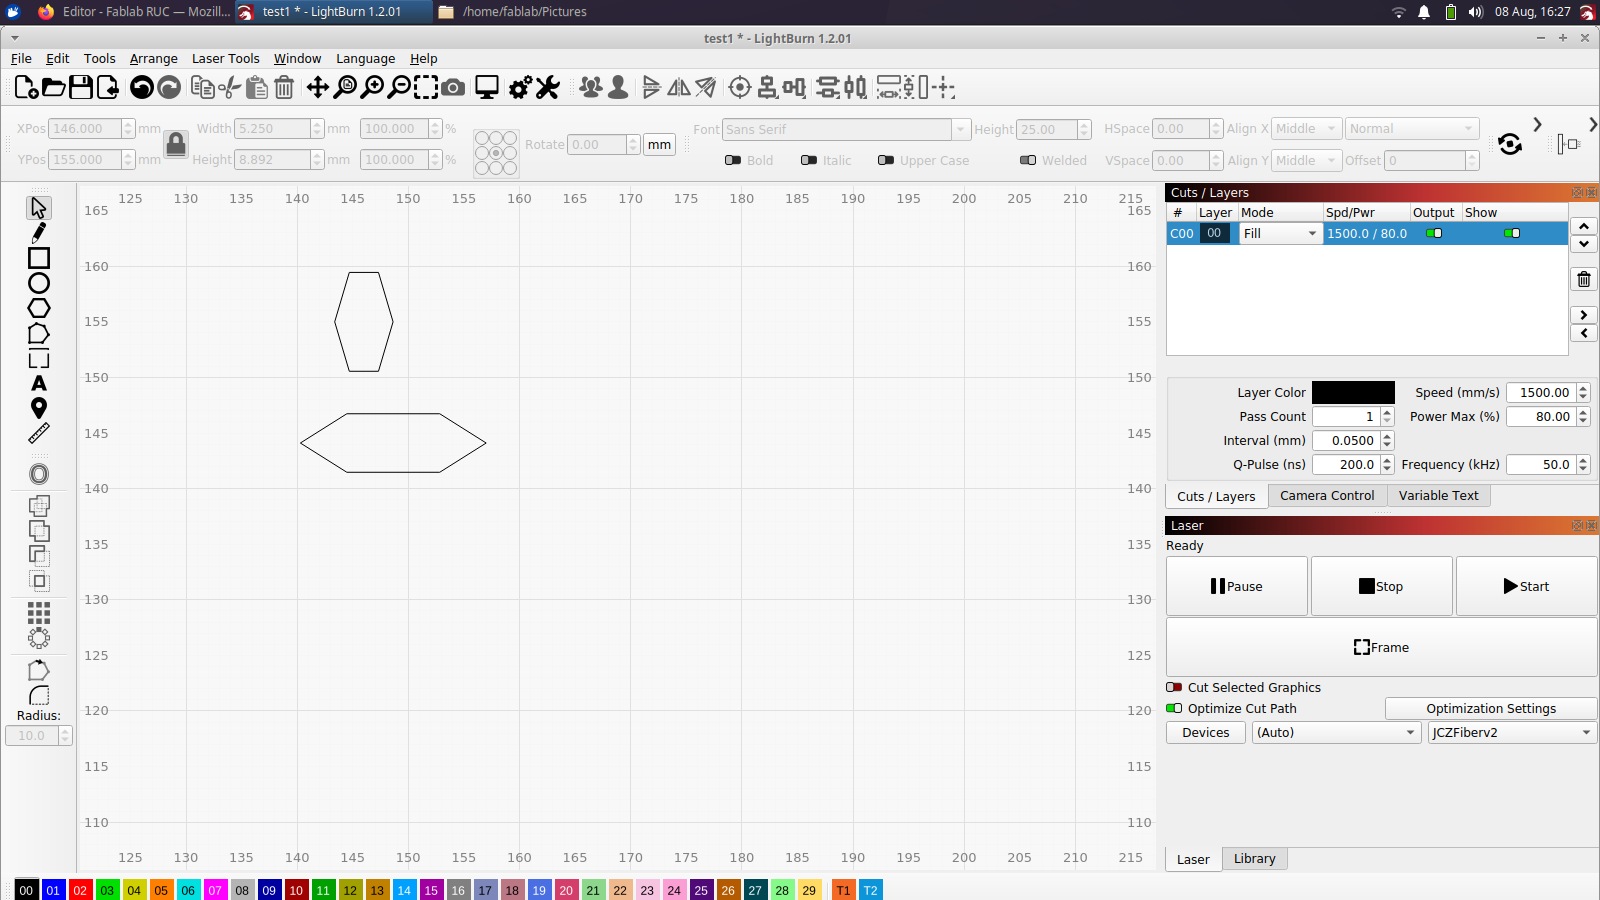
Switch to the "Select" tool by pressing escape, or by clicking the arrow icon on the top left, then you can select a hexagon by clicking. When it's selected, you can move/scale/rotate it till you like it.
When you like the shapes, select a hexagon and click the blue color (01) at the bottom of the screen. Change the other hexagon to red. Save your file to a USB stick, so you don't lose your work by accident.
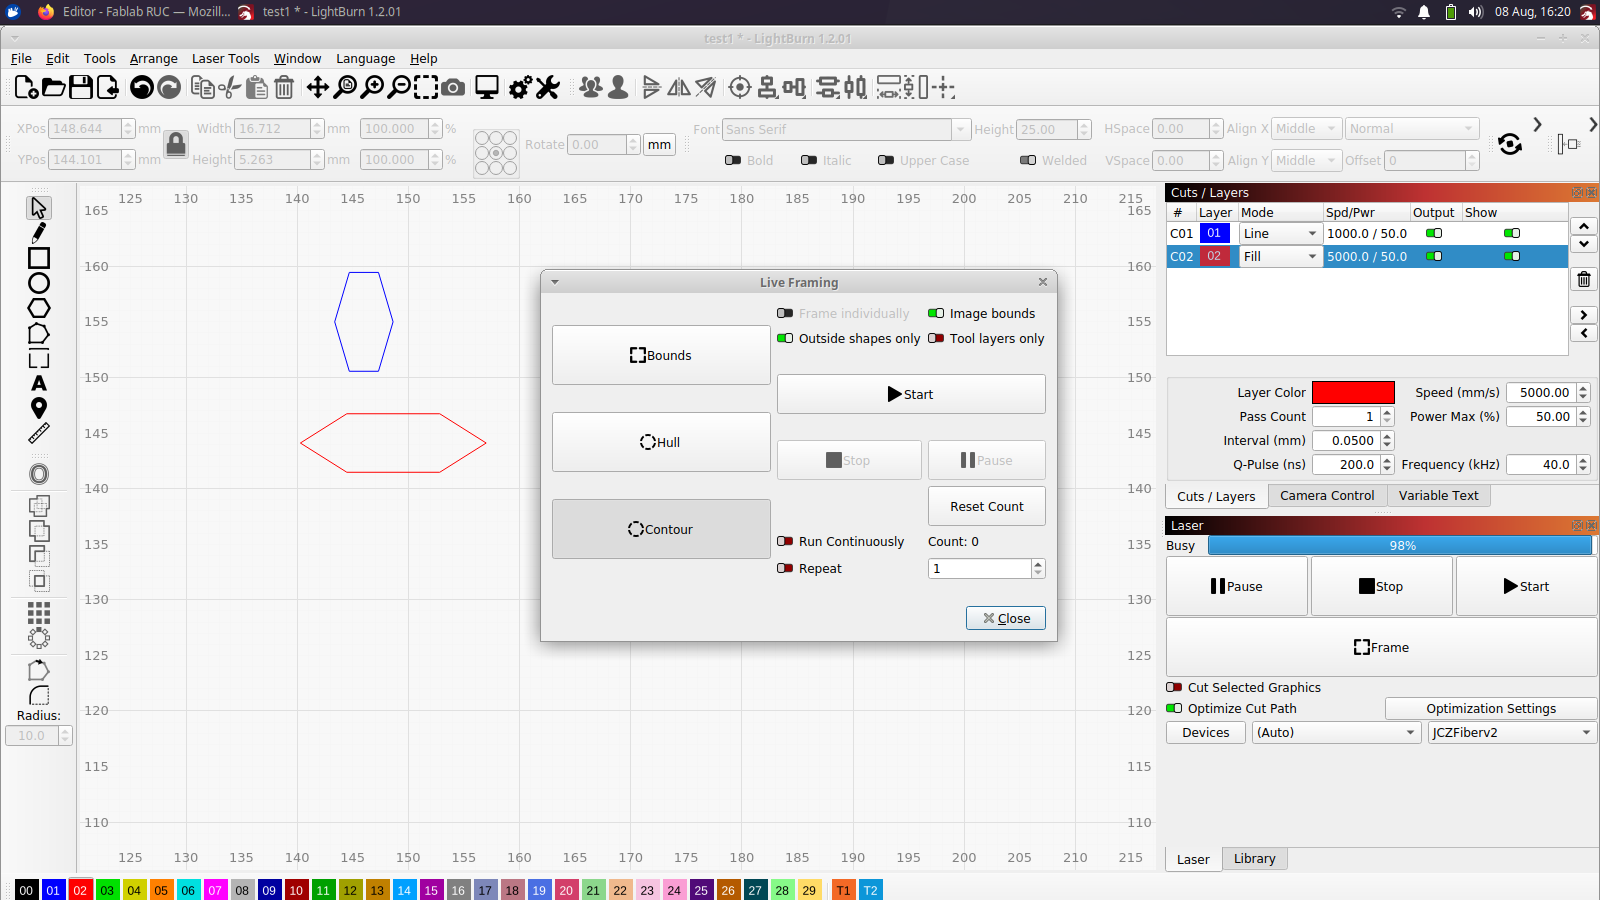
Now look on the right, make sure "Cut Selected Graphics" is off. Click the "Frame" button on the right. The laser will show you where the cup is going to be marked. Try clicking "Bounds", "Hull", and "Contour". Move the cup around (or close the "Frame" window and modify your design) until you're happy. Close the "frame" window.
Now we must specify how we want the laser to execute our design. Under "Cuts/Layers" (top right), select the blue layer. "Mode" should be set to "Line". Change the values below to Pass Count = 1, Speed = 3000, Power Max = 50, Q pulse 200, frequency 50. Select the red layer, and change the mode from "Line" to "Fill". Pass Count should be 1, Speed = 5000, Power Max = 50.
Click the "Frame" button again, and double check that your design fits. Close the hatch. Press "Start". The laser will burn your design, when it's done, it will switch from "Busy" back to "Ready", and show the frame again. Then you can open the hatch and take out your product.

Importing graphics
You can design simple graphics in LightBurn, but the program is not the best for the job, it is primarily designed for controlling lasers. Often you'll either download the graphics you want from somewhere, or create them in another program. Then you use File->Import to load them in LightBurn and describe how you want them engraved. (If you create in another program, pick different colours for your object so it's easy to specify engraving order/style in LightBurn).
The main three categories of image are Line Drawing, Black and White and Greyscale:
Line Drawing
These are traced as lines by the laser - "Line" mode in the test project above. Normally they'll be saved as vector graphics, typically in the .svg format. A good open source program to edit these is Inkscape which is also installed on the fiber laser laptop, so you can do last minute edits. If you want different parts of the drawing in different styles, it's a good idea to make them different colours when editing, or you might have to select them individually after importing them to LightBurn.
If you want to do a line drawing based on a raster graphics image, import it, right click and select "Trace Image". Then you can have LightBurn outline the shapes. A good open source program to edit raster graphics, GIMP is installed on the fiber laser laptop.
Parameters for different linestyles/materials are available in the "library" (bottom right), select the relevant one and click "Assign" to transfer the parameters to the selected layer.
Black and White
These are filled with colour by the laser - "Fill" mode in the test project above. Often they'll be saved as vector graphics, typically in the .svg format. A good open source program to edit these is Inkscape which is also installed on the fiber laser laptop so you can do last minute edits.
If you want different parts of the drawing in different styles, it's a good idea to make them different colours when editing, or you might have to select them individually after importing them to LightBurn.
If you want to do a black and white drawing based on a raster graphics image, import it, right click and select "Trace Image". A good open source program to edit raster graphics, GIMP is installed on the fiber laser laptop.
Parameters for different styles of lines/materials are available in the "library" (bottom right), select the relevant one and click "Assign" to transfer the parameters to the selected layer.
Greyscale
This is an image where the image is shaded in various greytones. It is the hardest type of image to get right when engraving, so prepare to spend some time and material on testing.
Greyscale images are normally raster graphics. A good open source program to edit raster graphics, GIMP is installed on the fiber laser laptop.
Import the image and adjust scale and placing. In the first rounds of testing you'll probably want to save time and material by cropping or scaling the image to be very small. Then right click the image and choose "Adjust image". For several materials, good starting parameters for greyscale images are available in the "library" (bottom right), select the relevant one and click "Assign" to transfer the parameters to the selected layer. For some materials it might work well to put down a lightly toned base layer beneath the image. You can use the "Adjust image" function to adjust brightness and contrast for best results.
Material types
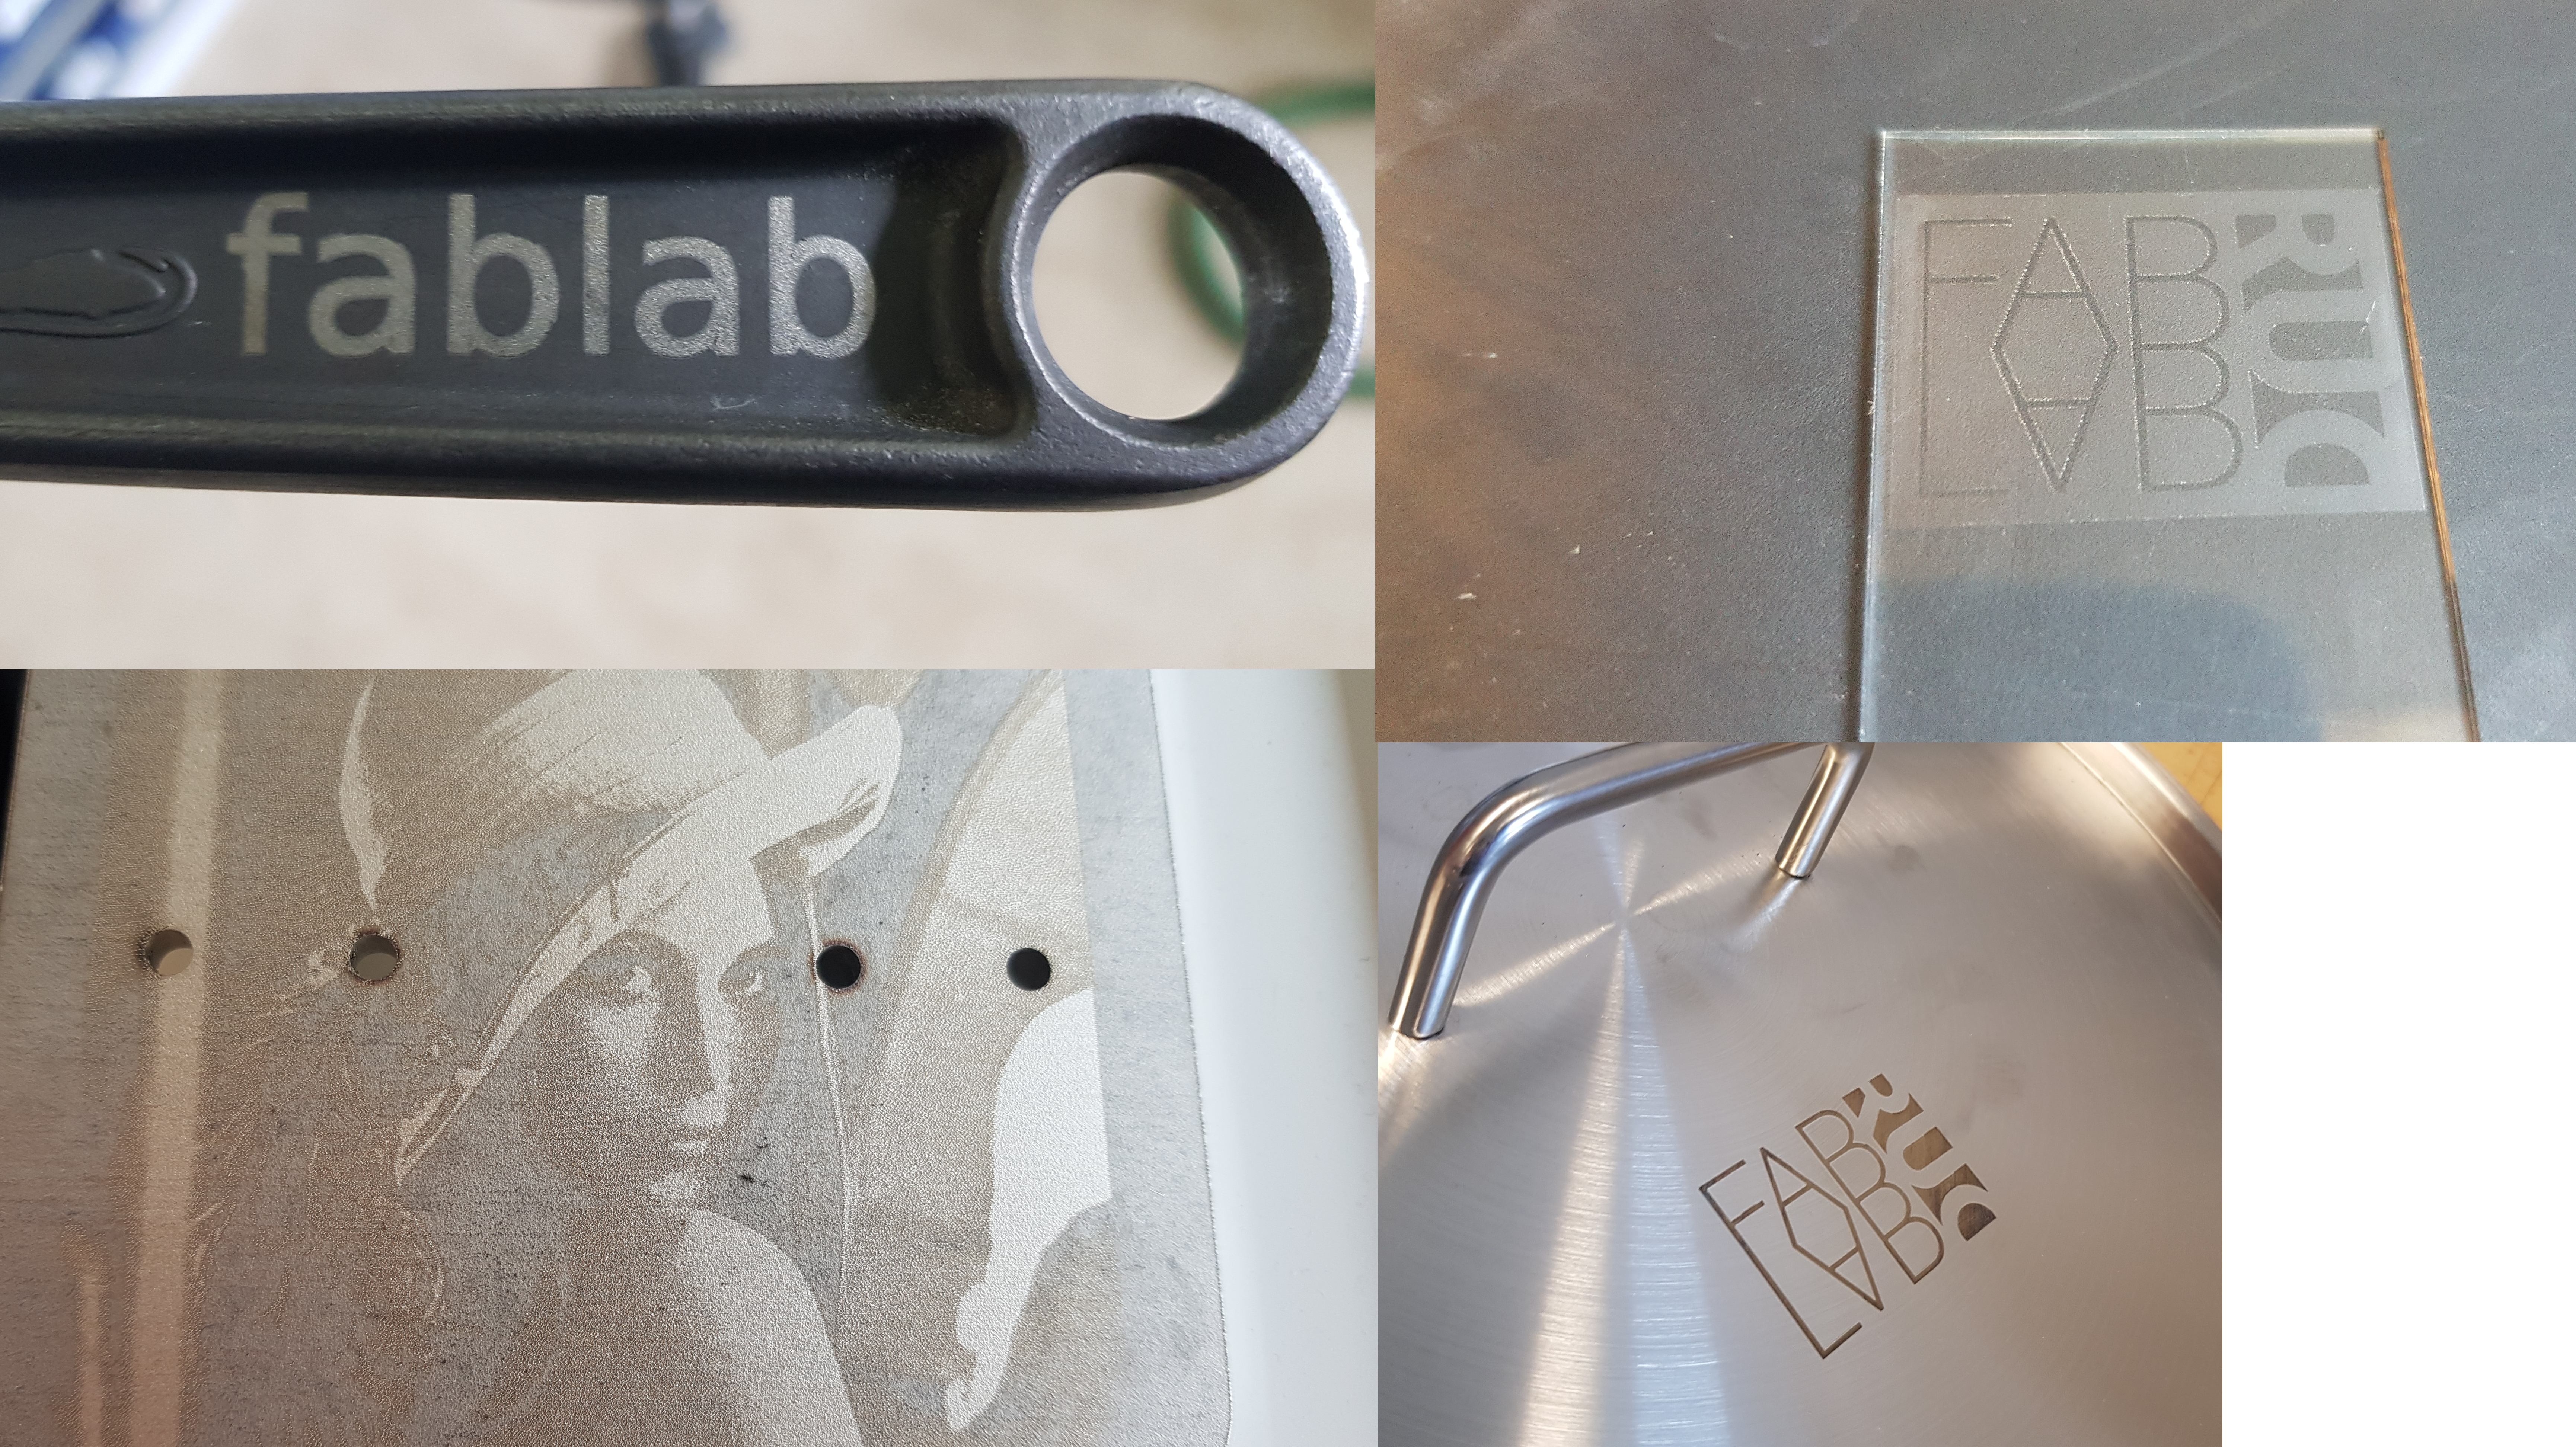
You can see various examples of engraving in the box on the workspace next to the laser.
Materials that work really well:
- Stainless steel (some colour/texture control possible). Thin plates may buckle, see "preparing materials" for tips.
- Black acrylic (very nice and smooth frosting), beautiful greyscale images.
- Aluminum (various frosted appearances)
- Macbooks/Ipads, both cover and keyboard. See the sample in the box. Ask if you want to try out your own design on the scrap Ipad/Macbook in the box before comitting your own computer.
- Some other plastics, should be opaque and homogenous: Frosted/burned depending on material
- Black/rusted steel (leaves clear area). This type of laser is often used for rust removal, so bring whatever you need cleaned off.
Materials that work, kind of
- Wood prepared with Cermark (see "preparing materials"). Still, for engraving wood/HDF we REALLY recommend the laser cutter next door.
- Glass, sometimes, if prepared with backing paint (see below)
- Shiny green acrylic. Takes a long time, leaves a grainy golden surface.
Materials that work really poorly:
- Wood and similar (fiber board, HDF, paper, cardboard). Will usually catch fire before they're engraved. The laser cutter next door works well for these.
- Clear acrylic - use laser cutter next door.
- Styrofoam - impossible to engrave
- Copper (and other metals that reflect 1064 nm infrared). Gold and silver probably don't work either, but if you donate a few kg we'll make an attempt for you.
- Galvanized metal: Emits toxic fumes, better avoid.
Preparing material
Any dirt on your surface may impact the quality of your engraving. If this problem occurs, you can go to the chemical lab and use acetone or isopropyl alcohol to clean your surface. Acetone is the most effective grease remover, but it can damage some types of plastic. It also tends to eat your brain, so keep things ventilated if you have a lot of work.
Materials that tend to reflect the laser can become easier to work with by spraying them with Cermark (in box next to laser), and then clean it off after engraving. This works to some extent with plywood but leaves a light grey sheen when washed off, and anyway the laser cutters next door are better for marking wood.
We have had some success in engraving glass (thin microscope slides from the lab) giving a light frosted appearance. This may not transfer to other types of glass, but you can try this:
Cover the side you want frosted with dark acrylic paint (available in box in the common space). Let it dry. Engrave glass with paint side down, resting on a metal plate. Parameters: Speed 1000, power 100, freq 40, Q 200, Interval 0.05, Passes 5.
The glass frosts only where painted, you can put your fingerprint in paint and have it engraved. If you leave it far from subduction zones it should outlast your actual finger by a good billion years.
When engraving stainless steel the plate absorbs a lot of concentrated heat from the laser, this might cause it to buckle, at least for 1 mm thickness that is a problem, thick plates should resist better. Simple water cooling can reduce the problem: Put the plate in a box or tray with space below (use the aluminium stoppers from the workspace as spacers). Fill the space below the plate with water but don't leave drops where you want to engrave. Depending on your design, you can also try to split it into smaller sub-engravings and take cooling breaks. Use the "output layer" switches to do one layer at a time, or order the layers so the laser does a long jump after each shape.
Trying new materials
We'd love it if you make the laser engrave a new material, please tell us what works (and save a file, so we can add it to the library). When working with a new material, there's a lot of tedious trial and error involved in finding the right laser parameters. This work goes a lot faster with the "Material Test" tool, which automatically creates a row-and-column pattern that show the combined effect of varying two parameters.
For your own purposes, try looking up the material in the sample library that looks the most like what you need, and use those values as a starting point. If your material is flammable, start with high speed, low power, high interval and small square size and watch out.
The laser interacts with the material in various ways. A lot depends on how much of the energy is absorbed, instead of reflecting or passing through. Copper, for instance, reflects infrared very well and is extremely hard to engrave. Glass lets the light through, and requires a backing to engrave. Material of uneven colour absorbs unevenly and are hard to toast evenly.
Where the energy is absorbed, the first effect is a very local thermal shock, since the beam is pulsed. This may form small defects or burn marks in the material, which can help focus or absorb the next laser pulse. That is possibly why glass is engraved only after several passes - the tiny holes get enlarged each time.
While the laser works the heat spreads in the material, and the risk increases that it will catch fire, melt or crack. Quite possibly, the change in temperature will even affect how the material reacts to the beam, try putting it on a slab of metal to conduct the heat away. If too much heat is a problem, go to higher speed and line interval and a lower power, and compensate by using more passes. Maybe take a break between each pass to cool down - you can do this by specifying one pass and pressing start again after cooling. If you find an option in the program to do this automatically, let us know :-)
Crazy ideas
Can the engraver make printing plates? Some engravings have a rough, raised texture, perhaps they work for transferring your design to other materials in ink? Find out and tell us!
Technical details
The laser is a Cloudray 50W LiteMarker Fiber Marking Machine With JPT MOPA LP Laser. It's of the Nd:YAG type, the wavelength is 1064 nm (near infrared). It has a 300*300 mm working area. If you've got a similar setup, get in touch and ask for the materials library files.
