Rapid Prototyping
For the Rapid Prototyping (6 hours) course for Akademiet for Talentfulde Unge, you get
- An introduction to Arduino programming.
- A kit consisting of an Arduino microcontroller, some neopixels, a servo, a photoresistor and a potmeter
- An introduction to 2d vector drawing on computer
- An introduction to laser cutting
Then you can build some simple prototype first using paper and tape and then using cardboard or HDF, the sensors in the kit, and programming.
The following two Input/Output examples show how the components should be connected to arduino and how to program it. Try these examples out to understand how arduino works and how to use the photoresistor, the neopixel, the potmeter and the servo. Thereafter fell free to make your own experiments and build a prototype with these components.
Arduino
Download arduino development environment. Arduino is an open-source electronics platform that is used to sense the real world, make interactive projects and prototypes.
#1 - Using a photoresistor to control neopixels
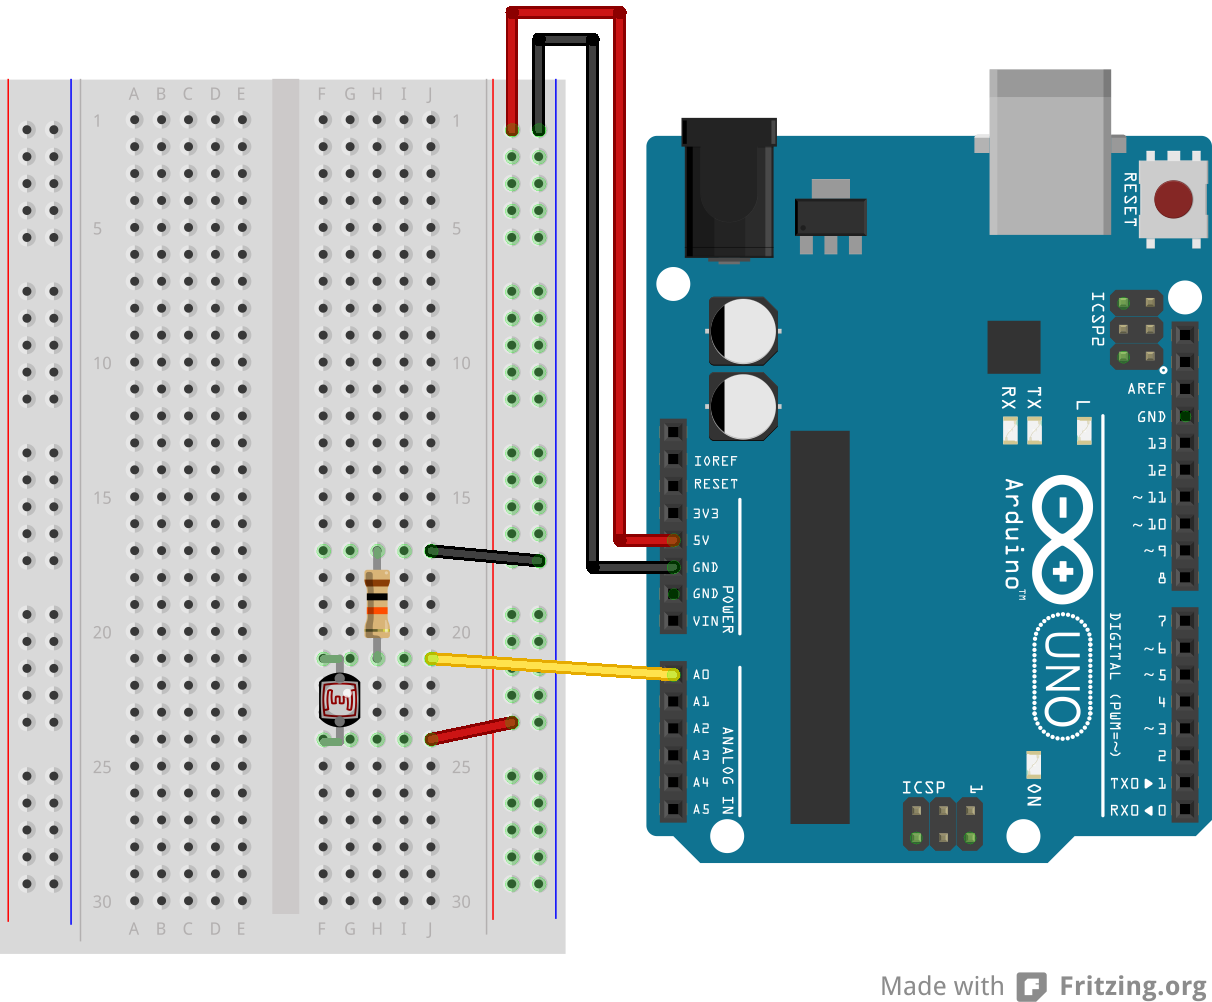
In this example the input is a photoresistor that can be used to measure light intensity. The input from the photoresistor is used to control the light intensity of the neopixels.
Circuit
![]()
Wiring photoresistor:
Wiring neopixel:
![]()
IMPORTANT: connect 5v to 5v on the arduino, DI to Digital Pin 2 and GND to GND. Make sure this is correct:
![]()
Code
Control neopixels
Neopixels are versatile light strings where each diode can be controlled individually. Each one has Red, Green, and Blue and can be from 0 to 255 in brightness. Multiple libraries exists to use neopixels. We suggest you use Fastled. Read more here.
Add the library: "menu->sketch->include library->manage libraries"

Search for "fastled" and click install

Copy the following code and past it to a arduino sketch.
#include <FastLED.h>

//Which pin is your pohotresistor connected to?
#define LIGHT_PIN 0 //define a pin for Photo resistor

//Which pin is your strip connected to?
#define DATA_PIN 2

// How many leds does your strip have?
#define NUM_LEDS 26

int lightInt;
int lightMap;

CRGB leds[NUM_LEDS];

void setup()
{
  Serial.begin(9600);  //Begin serial communcation
  FastLED.addLeds<NEOPIXEL, DATA_PIN>(leds, NUM_LEDS);
}

void loop()
{

  Serial.println(analogRead(LIGHT_PIN)); //Prints the value of the photoresistor to the serial monitor.

  lightInt = analogRead(LIGHT_PIN);
  lightMap = map(lightInt, 450, 980, 0, 255);

  //Capture the extreme values
  if (lightMap < 0) {
    lightMap = 0;
  }
  if (lightMap > 255) {
    lightMap = 255;
  }

  // lighting neopixels
  for (int i = 0; i < NUM_LEDS; i = i + 1)
  {
    leds[i] = CRGB(lightMap, 0, 0);
  }
  FastLED.show();

}
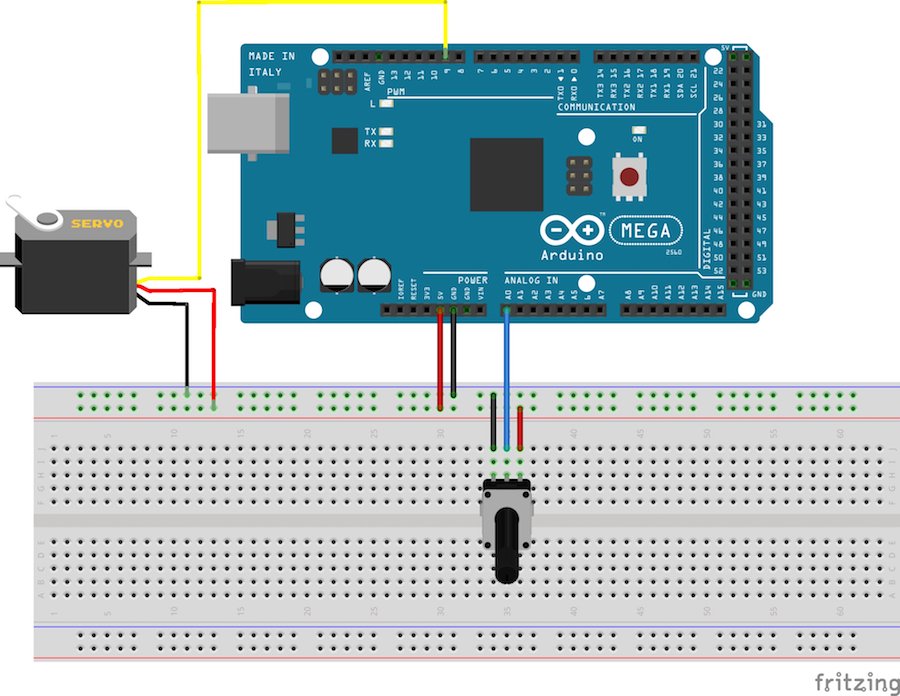
#2 - Using a potmeter to control a servo
Now the input is a potmeter which is a "volume knob" - a variable resistance, which we can read into the Arduino board as an analog value (read more here).
Servos are motors in which their position can be controlled. They have an action radius of 0 to 180 degrees. Some servos are "hacked" to be continuous. They will rotate 360 degrees, but cannot be positioned. They are then able to move in a controlled speed and direction. Orange and white wire is signal and should be connected to pin digital pin9.
Circuit
Code
/*
 Controlling a servo position using a potentiometer (variable resistor)
 by Michal Rinott <http://people.interaction-ivrea.it/m.rinott>

 modified on 8 Nov 2013
 by Scott Fitzgerald
 http://www.arduino.cc/en/Tutorial/Knob
*/

#include <Servo.h>

Servo myservo;  // create servo object to control a servo

int potpin = 0;  // analog pin used to connect the potentiometer
int val;    // variable to read the value from the analog pin

void setup() {
  myservo.attach(9);  // attaches the servo on pin 9 to the servo object
  Serial.begin(9600);
}

void loop() {

  val = analogRead(potpin);            // reads the value of the potentiometer (value between 0 and 1023)
  val = map(val, 0, 1023, 0, 90);     // scale it to use it with the servo (value between 0 and 180)
  Serial.println(val);
  myservo.write(val);                  // sets the servo position according to the scaled value
  delay(15);                           // waits for the servo to get there
}
