Automated wireless environment logger - EnvirXX
The EnvirXX will measure one or more of the following: Light, temperature, humidity, pressure, carbon dioxide (CO2), gas (VOC) and oxygen concentration (O2). The measurements will be transmitted over a local wifi connection and logged at ThingSpeak.com, where you can download them for analysis.
Here you will find instructions on how to build, configure and operate the EnvirXX.
Parts of the EnvirXX
The EnvirXX consists of the following components. The first is mandatory, the rest are optional:
- Wemos D1 R2. This is basically a small computer with built-in wifi. The module should have a microUSB port, and you need a USB to microUSB cable to couple it to your computer.
- Grove Digital Light Sensor (on mine it says v1.0). Light sensor.
- Adafruit BME680. Measures temperature, humidity, pressure and unspecified gases.
- Sensirion SCD30. Measures CO2 concentration, temperature and humidity.
- Grove gas sensor (O2). Measures oxygen concentration.
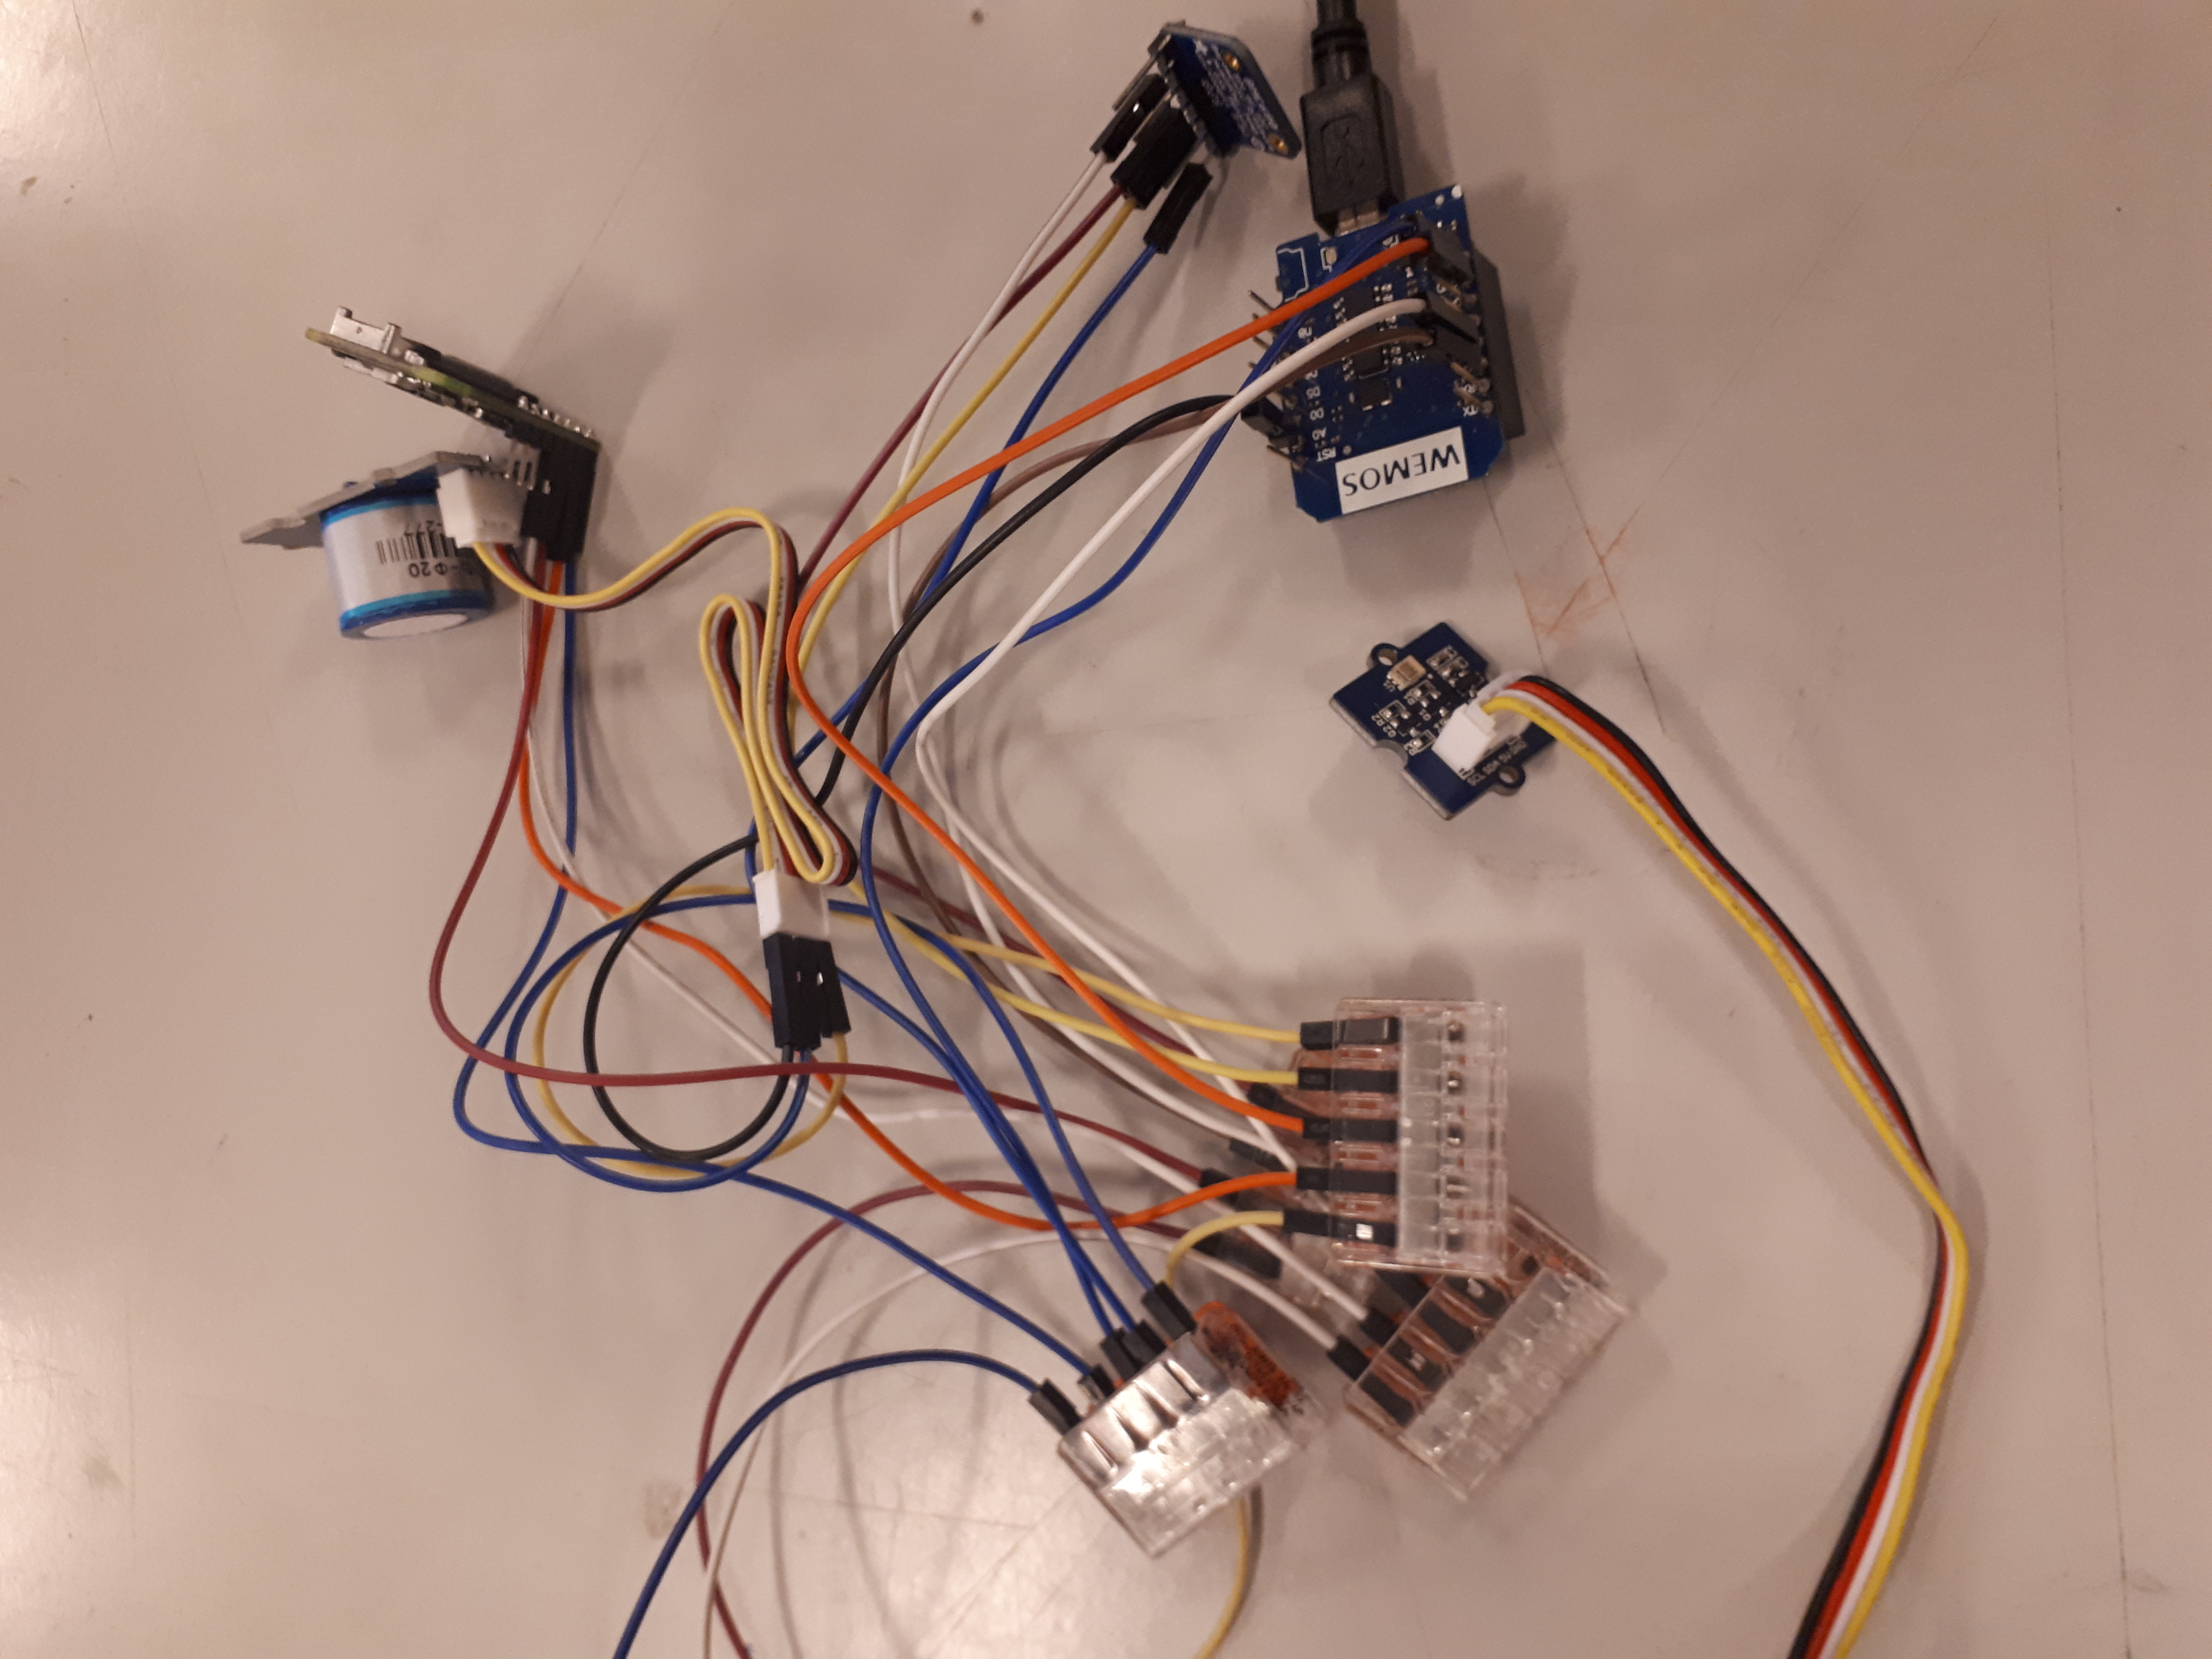
You can connect the parts in many ways, for instance by soldering wires, using a bread board or mounting on a circuit board. I used jumper cables and wago 221 connectors. It looks like this without the case:
Talking to the Wemos
While doing the building, it is an advantage to test your setup step by step. Follow these instructions to check that your computer talks to the Wemos and can load programs onto it. (When you can load the blink code and make the little LED on the Wemos blink you’re ok).
Building the EnvirXX
Now you’re ready to connect components. If you want to play it safe, go through the following instructions without adding any components. Instead, use the virtual test sensor, which will just send the numbers from 1 to 50 to ThingSpeak over and over without doing real measurements. After that you can add and test components one by one and it will be easier to spot defects.
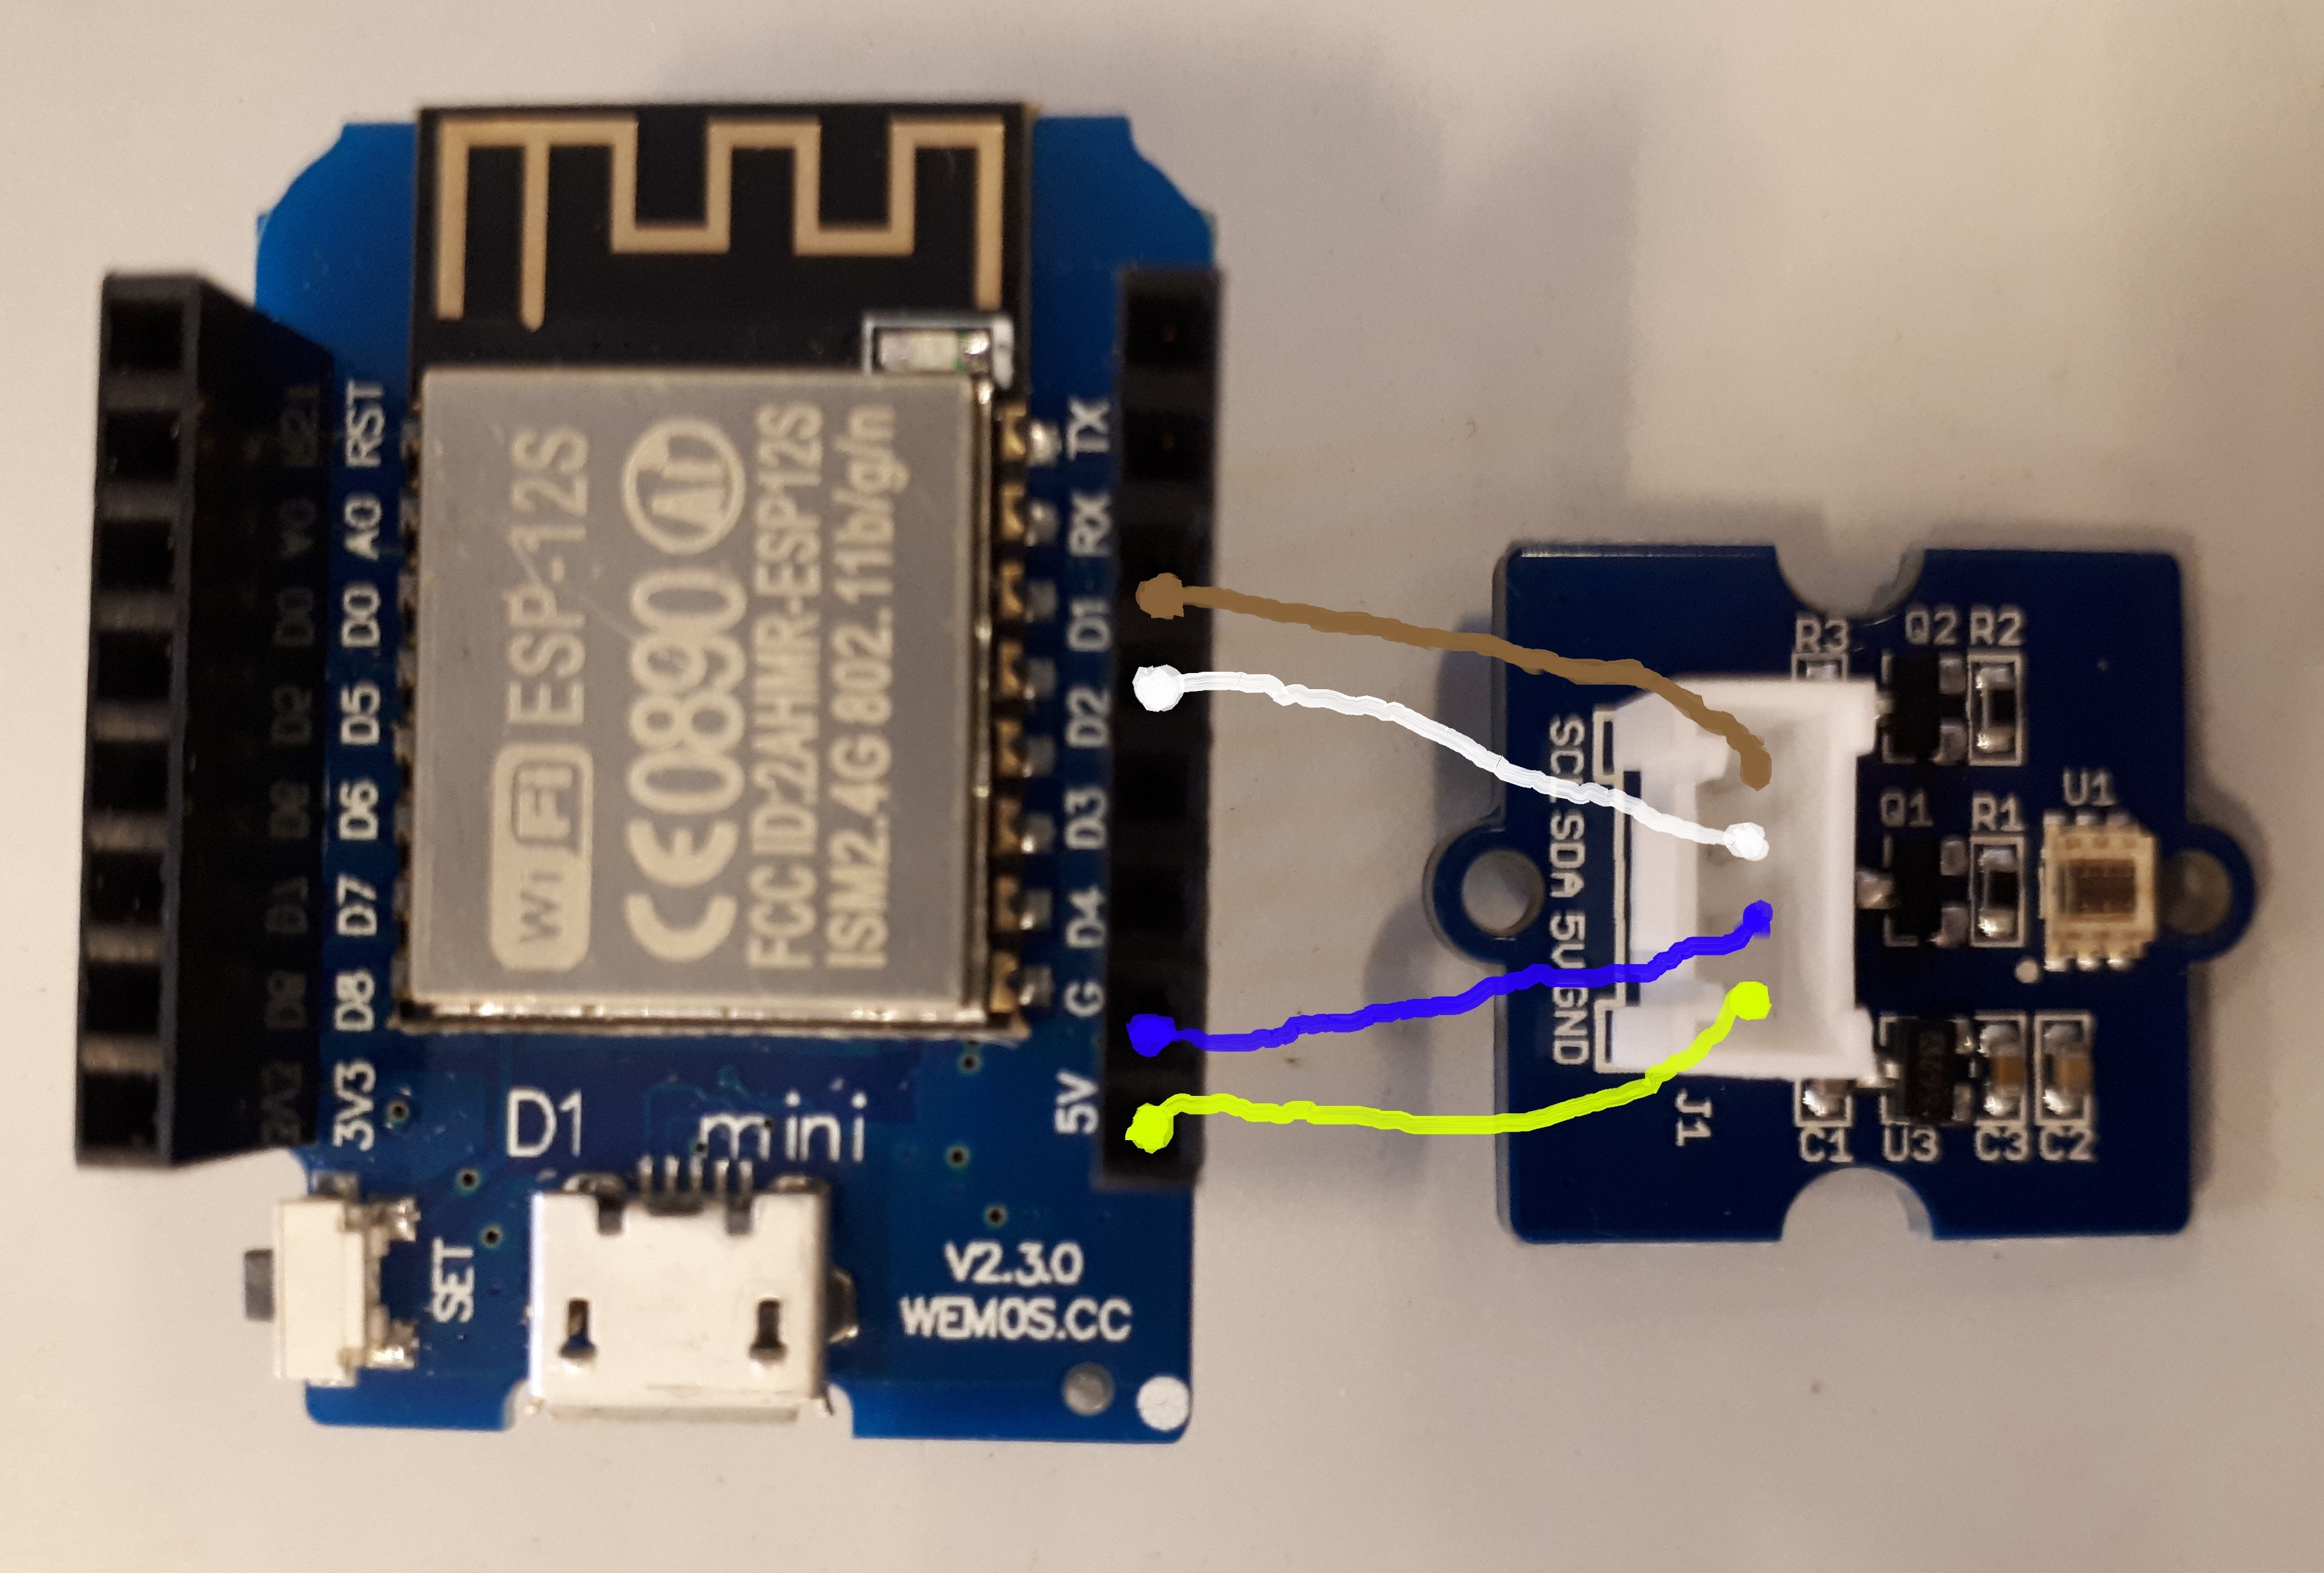
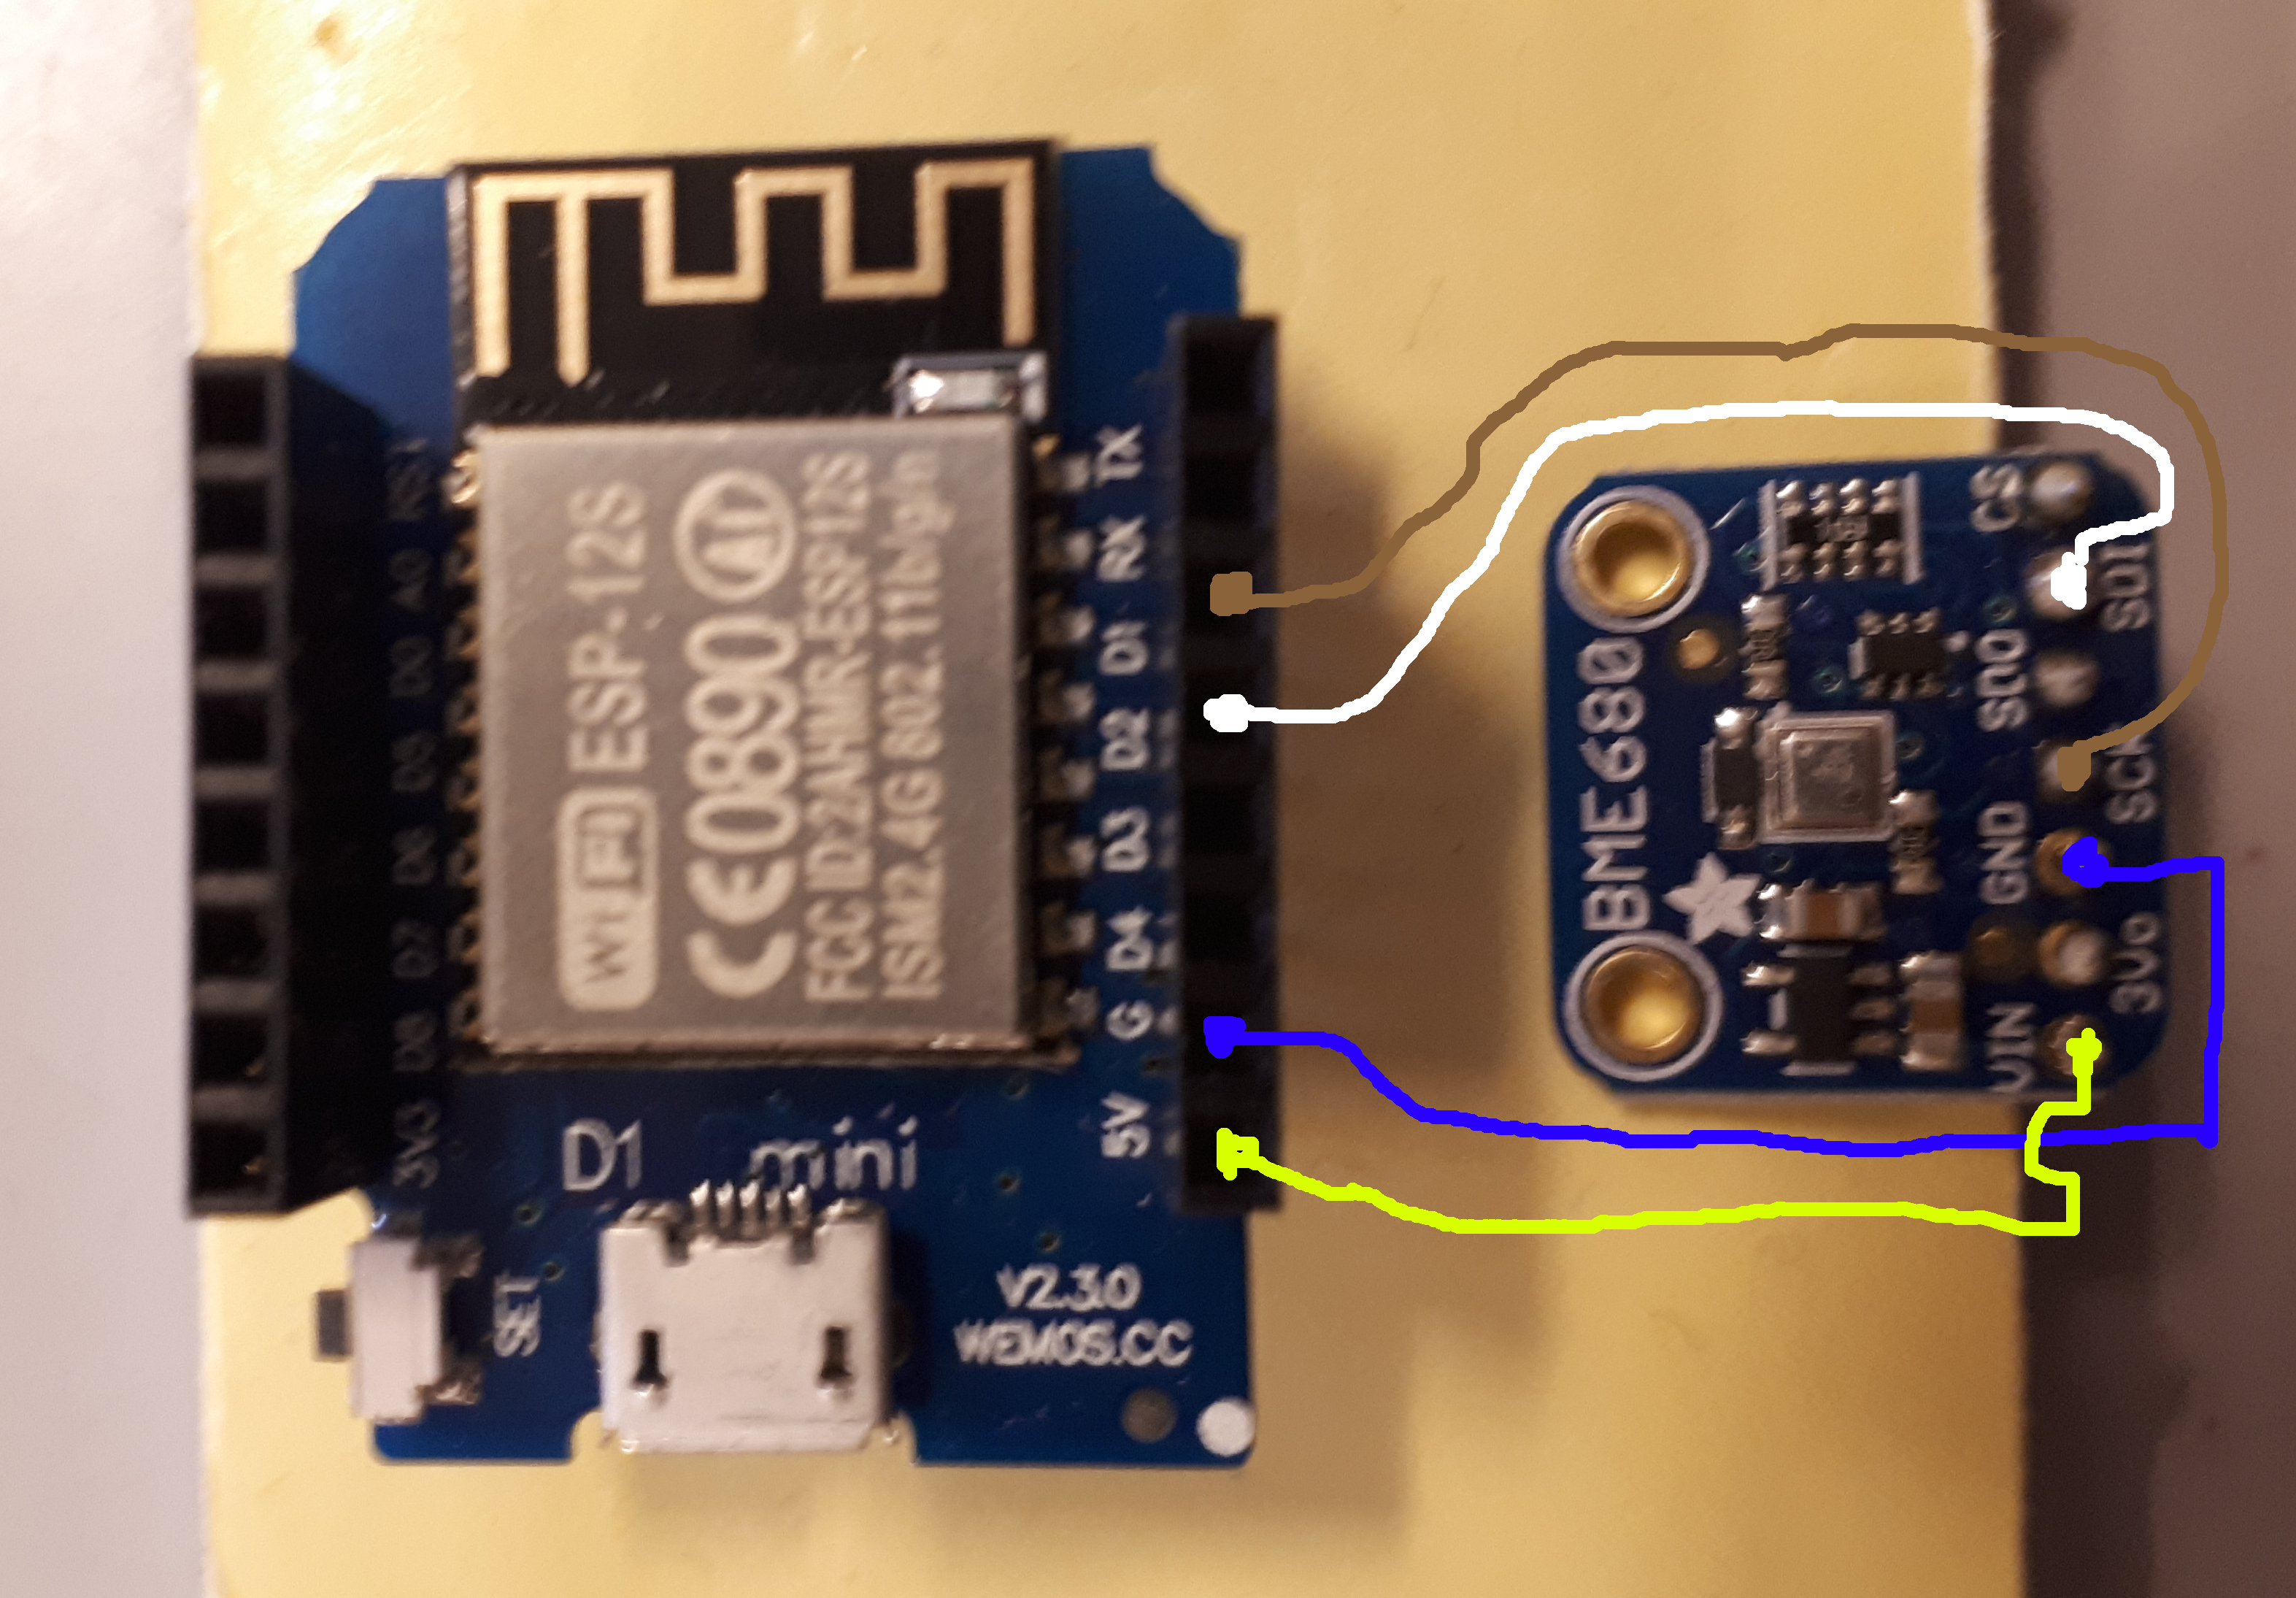
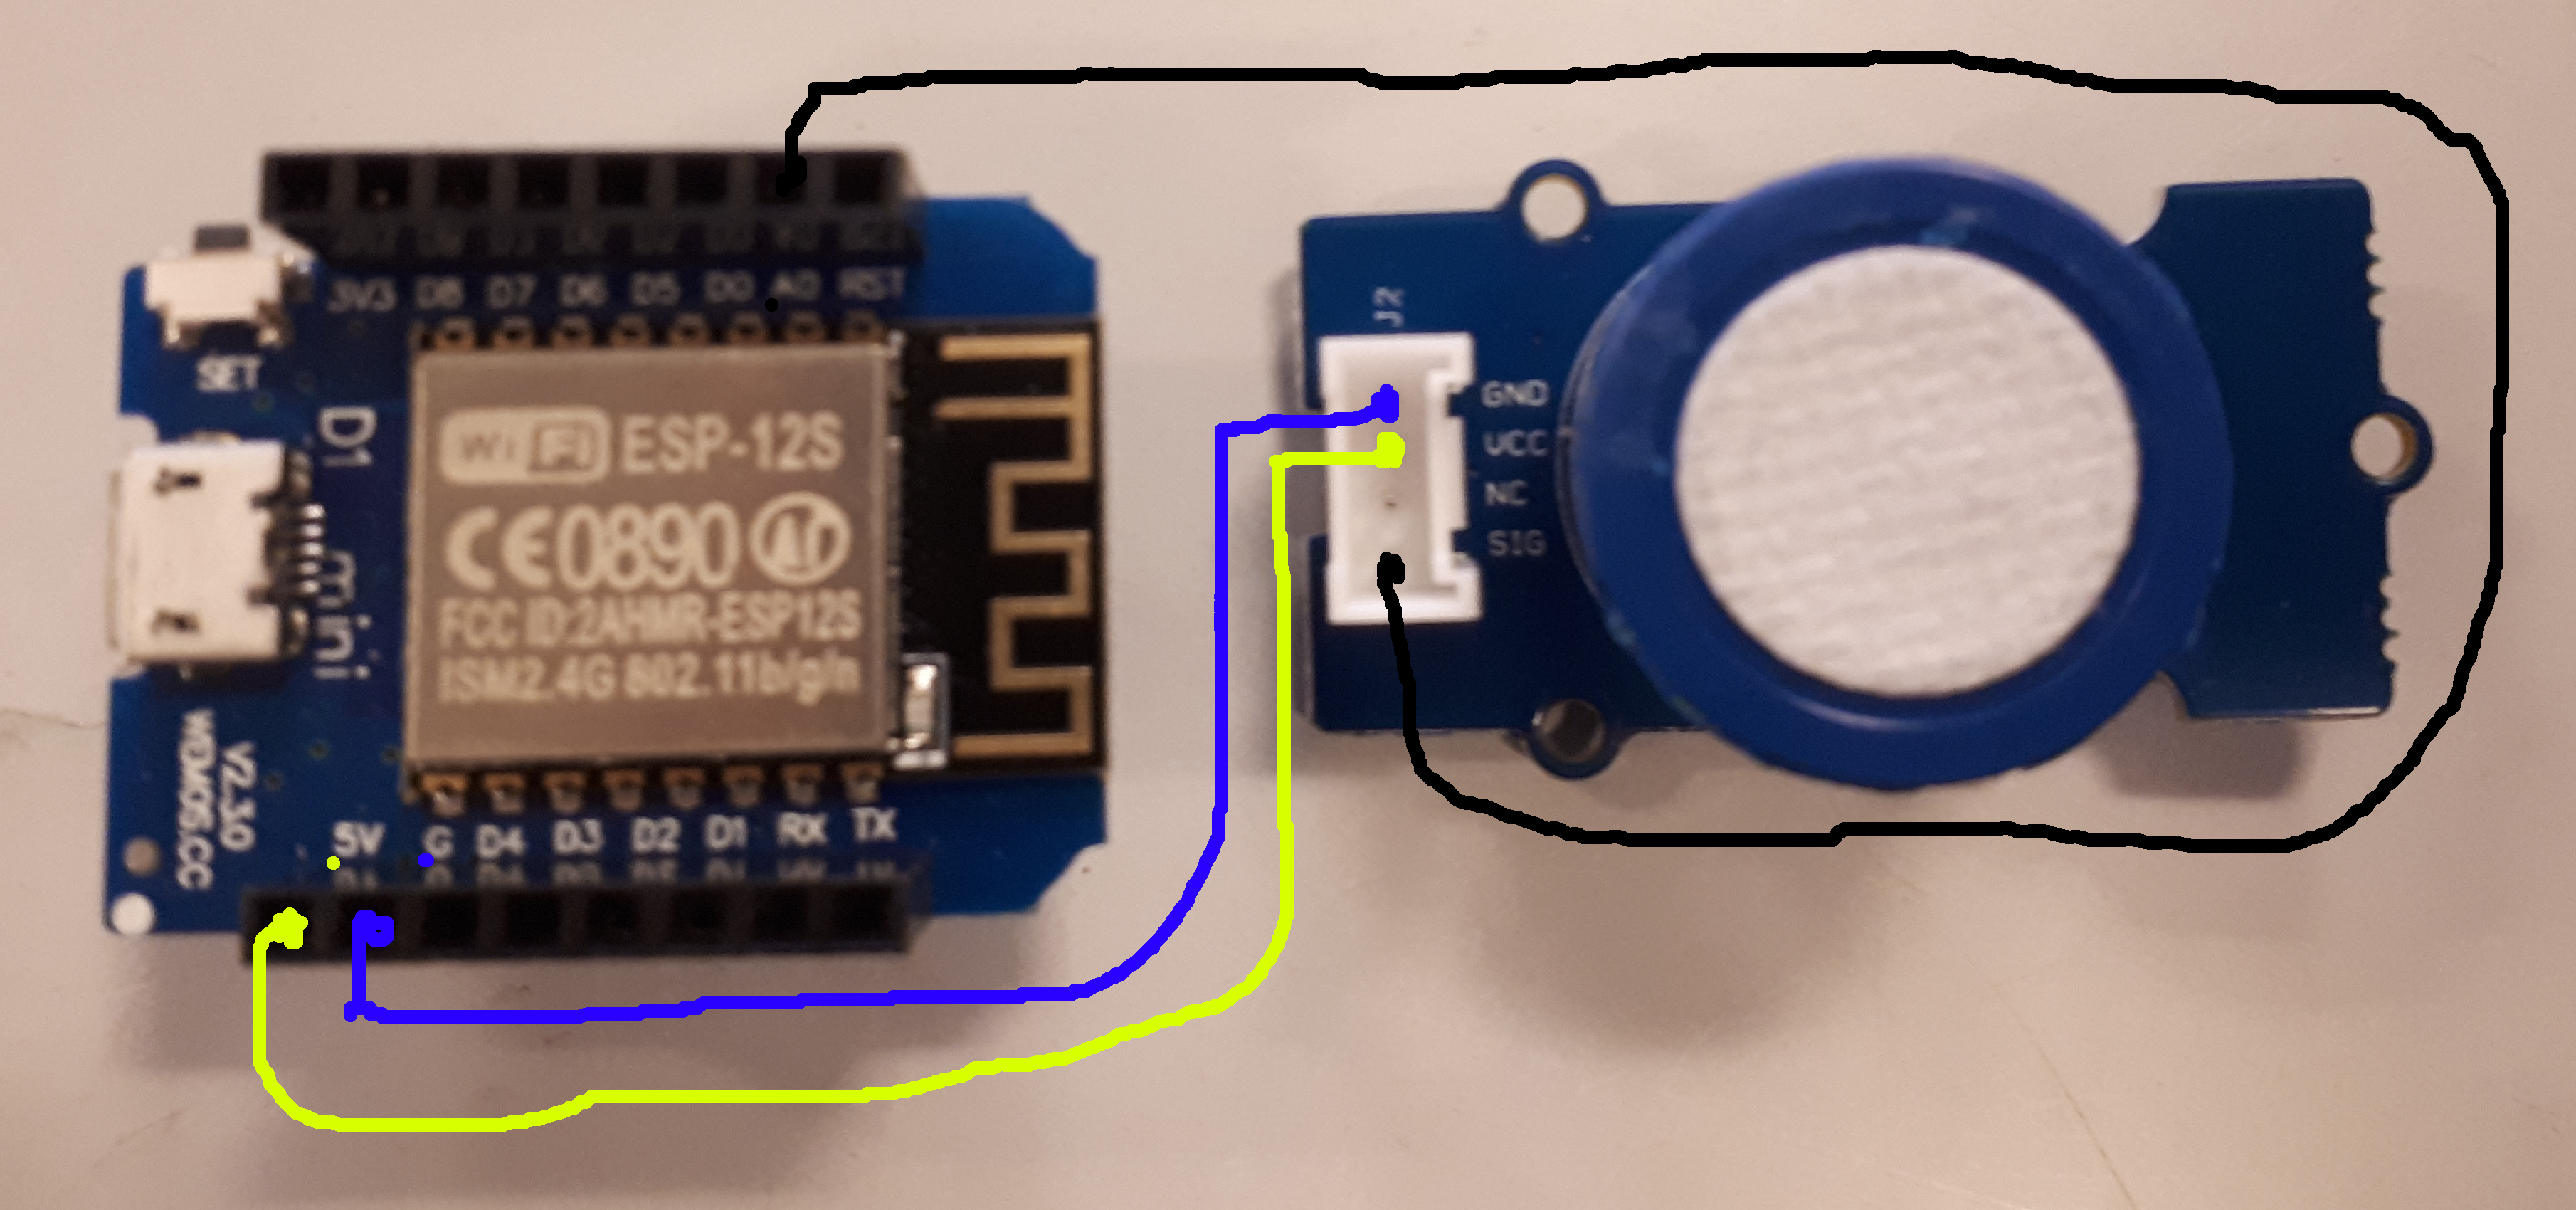
Depending how exactly your Wemos D1 R2 is mounted, the placement of pins may vary. You need the following pins:
Wemos pin   Connects to
  5V          Vin / Vcc
  G           GND / Ground
  D1          SCK / SCL
  D2          SDA / SDI
  A0          SIG (O2 sensor only)
Digital light sensor connections.
The light is sensed by the little 6-pin box next to "U1".
BME680 connections
SCD30 connections

O2 sensor connections
If you do not want or need a particular sensor, just leave it and its connections out.
Configuring ThingSpeak
Sign up for a free account at ThingSpeak.com.
Set up channels: Click Channels->My Channels. Then click "New Channel" on the page. Each sensor should have its own channel, name this one BME680 (for example). Check the boxes next to "Field 1", "Field 2" etc. until you have as many as you want for the sensor. (The BME680 logs 4 types of data, you can label the fields "BME680Temperature", "BME680Humidity" etc.) If you only want some of the measurements you can leave out some fields. Click "Save Channel" at the bottom when done.
If you don't want others to see your data, go to "Sharing" and set the channel to private.
Downloading EnvirXX software and libraries
Download this Envirxx.zip file with the code and extract it. Double-click the EnvirXX.ino file to open it with the Arduino IDE.
You also need to install some libraries: In the Arduino menu click Sketch -> Include Library -> Manage Libraries. In the search bar (top right) type WifiManager . Scroll down to the WifiManager library, click and select install.
If you wish to use the BME680 sensor: Install the Adafruit BME680 and the Adafruit Unified Sensor.
If you wish to use the light sensor: Install the Grove - Digital Light Sensor library.
Configuring the EnvirXX software
You will now set up the EnvirXX to talk to your ThingSpeak channels. In Arduino, open the EnvirXX.ino file. You will have to edit the lines that start with #define. Lets take the bme680 sensor as an example: Go to your thingspeak page, and find the channel you want to use for the bme680 data. Click on the link called “API keys”. Copy the Write API key from the page, and insert it into the file so it says
#define BME680APIKEY "MOXZA5YEO3K555RE"
(assuming your key was MOXZA5YEO3K555RE).
Now check the BME680 channel on the ThingSpeak page and look up field numbers you set up for the measurements. Say you want only the temperature and humidity from the BME680. Then change the field numbers in the EnvirXX file to match:
#define BME680HUMFIELDNUMBER 2 // BME 680 humidity
#define BME680TEMPFIELDNUMBER 1 // BME 680 temperature
#define BME680PRESFIELDNUMBER 0 // BME 680 pressure
#define BME680GASFIELDNUMBER 0 // BME 680 gas sensor resistor
The pressure and gas meter will not be logged, since the field numbers are set to 0.
The other sensors are set up in the same way.
If you don’t want to use a particular sensor (maybe it’s not installed), you disable it by disabling the APIKEY line by starting it with // like this:
// #define LIGHTAPIKEY "DFMQQF45PZMLM6F7"
In this case you can just leave the corresponding FIELDNUMBER lines unchanged until you need them.
The line #define MEASUREMENTINTERVAL 30 sets the interval between measurements in seconds. Note that free ThingSpeak channels will not allow you to log more often than every 15 seconds (I think).
When you're satisfied, save the file, and load the program onto the Wemos by clicking the right-pointing arrow in the Arduino menu.
You can get a detailed look at what the EnvirXX is doing, by choosing Tools -> Serial monitor from the Arduino menu. The speed in the lower right corner should be set to 115200 baud.
Configuring the EnvirXX network
When you first start up the EnvirXX, it will turn into a wifi access point, with the name (SSID) "envirxx", password "asdfasdf". Use a computer or phone to log on to this network, and go to the address http://192.168.4.1
You will get a menu where you can select the wifi network you want to connect to, and enter its password. Once you have connected, the EnvirXX will automatically send measurements to ThingSpeak as long as it has power and a signal. The EnvirXX accesspoint will disappear. You should now see data appearing in the channels on the ThingSpeak homepage.
Please note that the data is sent unsecured across the internet. Someone along the way could read your data, or even inject fake data into the ThingSpeak channel. If you use a secure Wifi network, that should protect your data until the Wifi access point.
Casing
When you have verified that your EnvirXX is working, it's time to mount it in a case, depending on how and where you want to use it. It is powered through the microUSB. Do you want an internal battery/powerbank, or plugged into a wall charger? Is it exposed to rain? How should the light sensor be exposed? A hole of a few millimeters should be enough to ensure that the sensors are exposed to the same gases/humidity as outside, but you can make several holes to be sure. The unit doesn't draw much power, so the temperature measurements should not be too affected by heat from the electronics, but run your own tests if in doubt.
My version is in a small plastic case with a slit cut for the light sensor, and a hole for the power cable. The Wemos is in the corner with the antenna (opposite the USB connector) towards the outside, since I have the idea that leaving it in a tangle of cables might weaken the wifi signal. In any case, a metal case would probably block a LOT of the signal.


Running the EnvirXX
The EnvirXX will keep logging while it has power and signal.
If it resets (say, power fails): It restarts automatically when power comes back on, and tries to reconnect to the old network. If that is unavailable, the EnvirXX accesspoint reopens (password asdfasdf), so you can choose a different network. If you don't manage to connect it to a new network within 5 minutes it resets to start over again.
If signal is lost, the EnvirXX keeps trying to send for a period. If it keeps failing it will reset. The same might happen in case the SCD30 or BME680 do not respond. The time until reset is 10 minutes plus 3 measurement intervals, for example 10+3*5 = 25 minutes if your measurement interval is 5 min.
Troubleshooting the EnvirXX
Try contacting fablab.ruc.dk, then maybe we'll update this guide :-)
